SMALL MINIATURES
by Bob Wilson
|
|
.JPG)
|
|
The title “Small miniatures” may
initially seem a contradiction in terms as one would think that all
miniatures are small. The difference become more apparent when one
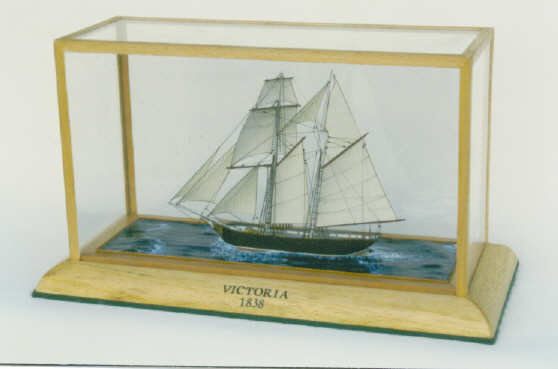
considers the vast range in ship sizes. Take the first two photographs,
for instance. They show a small model of the schooner VICTORIA, built to a
scale of 20’=1”. This tiny vessel was only 88 tons and had a length of
73.5 feet. This gave the model a hull length of 3.7 inches which is quite
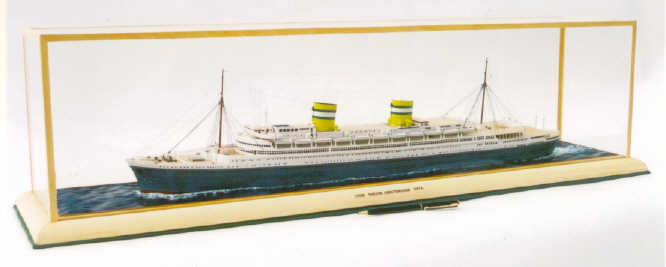
small even at this scale. The third photograph shows the Dutch passenger
liner NIEUW AMSTERDAM, at the much smaller scale of 32’=1” This ship had a
gross tonnage of 36,287 and a length of 759 feet, giving the model a
length of 23.7 inches, just under two feet! So from these examples, you
can see that there are miniatures and miniatures. |
|
Most of my models these days are at the scale of 32’=1” whether they are
small sailing ships or large passenger liners. From time to time, however,
I do venture into smaller scales.
It occurred to me that anyone wanting to try a miniature might find it
worthwhile experimenting with either a small vessel at 32’=1” or a larger
one at say 50’=1”. By starting small, one can get the feel of miniatures
without any great expenditure in tools, materials or plans.
|
|
|
|
Plans can be a problem for people who prefer larger models, but for the
miniaturist, it is not so bad as large amounts of them can be found in
books. The plans for VICTORIA can be found on pages 135 and 136 of the
book MERCHANT SAILING SHIPS 1815-1850, by David R MacGregor. This book was
produced in the mid 1980s and can be obtained from local libraries in the
U.K. Alternatively, copies can usually be found on website
www.bookfinder.com The book contains numerous small scale plans and is a
very useful source of information.
Another book which is lavishly illustrated with plans of small sailing
vessels is SCHOONER SUNSET by Douglas Bennet. This book is still in print
as it was produced in 2001 (Chatham Publishing). I found the plans for the
small waterline schooner MARY B MITCHELL (See photograph) on page 200 of
SCHOONER SUNSET.
|
 |
|
Small sailing vessels are so straightforward that one doesn’t really need
to describe their fittings in any great depth, but I will just give a few
notes the fittings of the VICTORIA which is pictured before masting and
rigging commenced. The windlass is made from a piece of this dowel turned
in a handheld Minicraft 12 volt drill. The turning tool was simply a small
round file. The companionways were quarter sections of slices cut from the
end of a wooden dowel. Hatches were simply oblongs of thin obeche wood.
The bulwark panels were printed on the computer using the “Box Drawing”
section of type styles. This facility is also available on Corel and even
the old Locoscript. The panels were printed onto paper, reduced to the
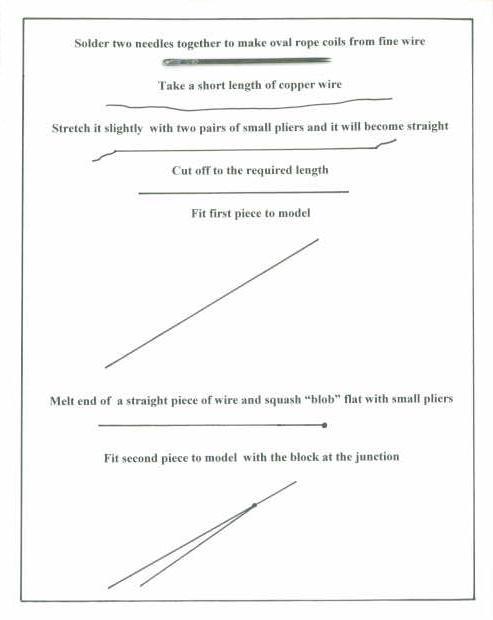
required size in a zoom copier, cut out and stuck on. The rope coils were
made by soldering two needles alongside each other. Fine enamelled copper
wire is then wrapped round the needles and the resulting oval spring slid
off. The oval coils are cut from the end of the spring with the modelling
knife. The two short brass rods protruding from the deck are what I term
“mast stubs.! The masts themselves are thin brass tubing and slide over
the stubs. The topmasts, booms, yards and other spars are also made from
thin brass rod, filed into tapers. These are all spray painted (aerosol
paint) the correct wood colour. Should you prefer to make wooden masts and
spars, there is no reason why you should not. It is simply a matter of
preference.
When it comes to rigging, I always used fine enamelled copper wire. It can
be purchased in small 50 gram reels from the Scientific Wire Company
(U.K.) mail order or web: www.wires.co.uk . They produce a small catalogue
giving prices and wire diameters in millimetres. For the VICTORIA, I used
38 s.w.g. gauge. To blacken the wire, use a thick felt-tipped marker pen –
it is so much easier than messing about with chemicals!
|
|
|
|
Take about six inches of blackened wire and pull it gently with a small
pair of pliers on each end. When you let go, it will be perfectly
straight. Measure the points on the model where you wish the rigging to go
with a pair of dividers and cut the wire to length with a modelling knife.
Pick the straight piece up with a pair of tweezers, dip each end in
contact adhesive and place it in position on the model. It is as simple as
that! There are no knots and no fiddling about. I prefer Thixofix for
rigging because it does not string as badly as the more popular Evo-Stik.
Where a block is required, you will find that if you play the flame of a
small blowtorch (or even a candle) on to the end of a piece of fine copper
wire, it will melt and form a small round “blob.” Squash this blob flat
with a small pair of pliers and apply the wire as shown. Once painted, it
all looks very fine and quite realistic.
|
 |
|
There is really no limit to miniatures and to illustrate this, I have
included the tiny plank-on-frame brig NEILSEN, perched on top of a
matchbox. I built this twenty years or so ago, just for the challenge. The
frames were cut from 1/16th inch obeche sheet and planked in veneer. The
plans came from FAST SAILING SHIPS by David R. MacGregor, pages 69 and 70.
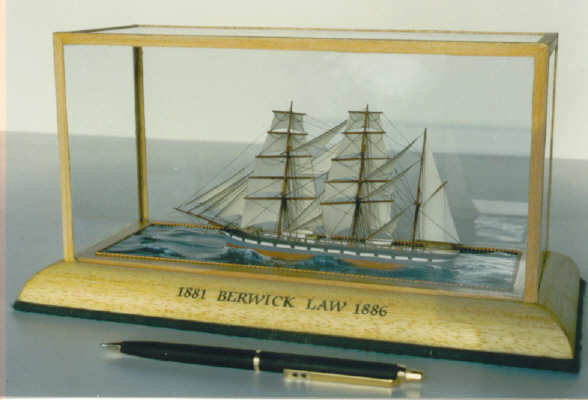
The final picture is of a model of the steel barque BERWICK LAW, built to
a scale of 50’=1”. Although I have not bothered with ratlines at this
scale, the model has still turned out well. Whilst on the subject of
ratlines, I will add that these are also of fine copper wire soldered in
position. The process is not as time-consuming or difficult as you may
imagine, but the process will be the subject of a further article.
I have no connection with publishers or authors of the books mentioned,
products or suppliers, but am simply recommending them because I find them
extremely good value!
Happy modelling
Bob Wilson
|
|
.JPG)
|
|
|
|
|
|
|