Model Boat Mayhem

Please login or register.

Login with username, password and session length.
Pages: [1] 2 3   Go Down

Author Topic: Flower Corvette conversion by jonny shoreboy.  (Read 31900 times)

jonny shoreboy

  • Guest
Flower Corvette conversion by jonny shoreboy.
« on: April 05, 2009, 07:56:44 pm »

Hi everyone.

I have just started to build my first r/c boat. I am converting the Revell HMCS Snowberry kit into a working model and I thought the best way to keep all my questions into one place was to start a build log for the project, so here we go...

The first thing I noticed when opening the box is the sheer number of bits included in the box! The Revell kit is a re-release of the earlier Matchbox kit and has parts to build three different ships: The HMCS Snowberry, USS Saucy and the model I am building, the HMS Bluebell. The earlier Matchbox kit instructions are for the HMS Bluebell but the Revell instructions are for the HMCS Snowberry and doesn't actually show any instructions to build the Bluebell, but all the bits are still included in the kit. Luckily I managed to track down a copy of the original Matchbox instructions to help me with my Bluebell project. In my opinion the Revell instructions are actually clearer so I have been using both sets.

Anyway, the first thing I did was run a bath and washed all the sprue's. My Father taught me to do this when I was just a wee nipper as he said that sometimes there can be traces of the releasing agent on the sprue's and by washing them in some luke warm water and a bit of washing up liquid this would be cleaned off which would result in a neater paint finish. It's a habit that has stuck and that is why i still wash all my plastics as a first step.
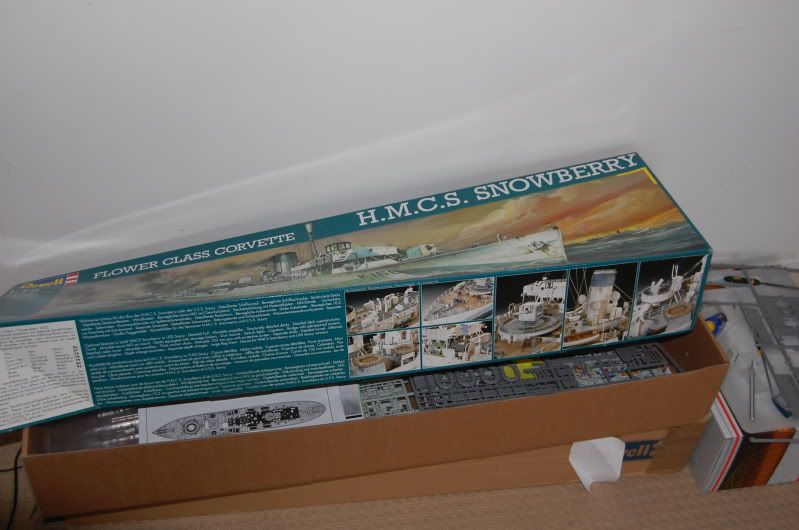

The box..
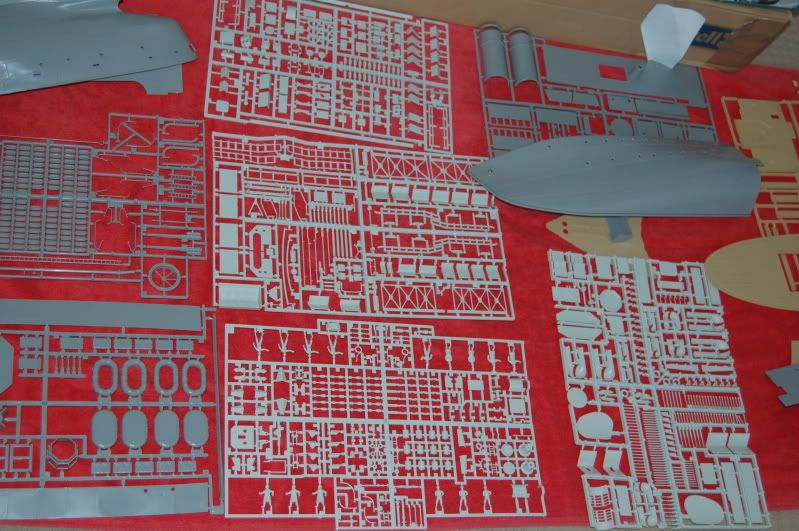

The sprue's drying out on a beach towel..

Once everything had dried out I did some test fitting on of the hull sections. For anyone who hasn't seen this kit before the hull is actually 4 separate pieces which you can see in the picture of the sprue's on the beach towel. Once they are glued together they are definitely going to need to be sealed on the inside somehow.
As this is my first working model I have decided to keep it as simple as possible. I don't really intend to do any bashing, I just want to get it on the water. However there are still lots of little things I am going to do to improve the kit to the best of my abilities. I am also using a website called Flower Class Corvettes which has loads of information about modelling corvettes which has been really helpful.

One of the biggest inaccuracies of the kit is that all the decks on the kit have been modelled with wood decking which isn't quite correct as they only had a small wooden section at the front and a small section at the back. My plan was to sand all the decks to make them appear correct once the model is painted. This took quite a long time and in hindsight I would scrape all the decks with a sharp chisel instead.
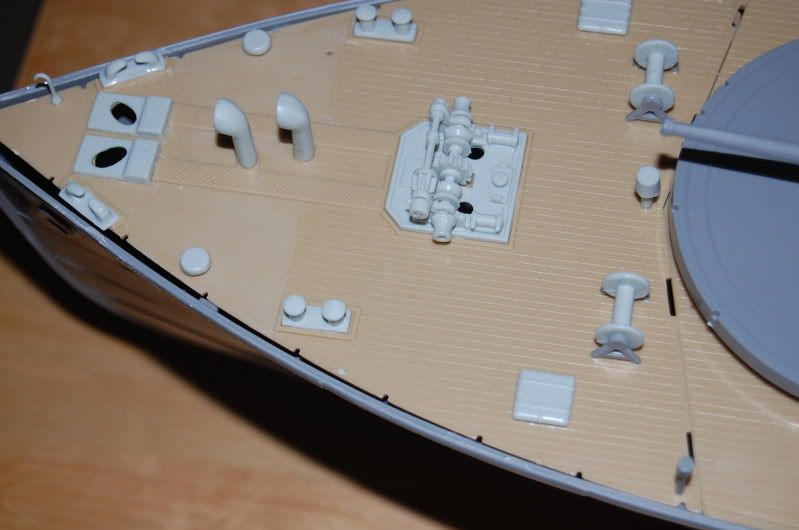


The next thing i decided to do was build the plastic kits in several sections which I will undercoat and paint then I will glue in all together later leaving access points for the radio gear. It takes a while to put together because I have been spending quite a bit of time removing mold lines and sanding joint sections, a must in my opinion as it really enhances the look of any plastic kit once it is painted. For the most part most pieces fit together without too much cleaning which is always nice.
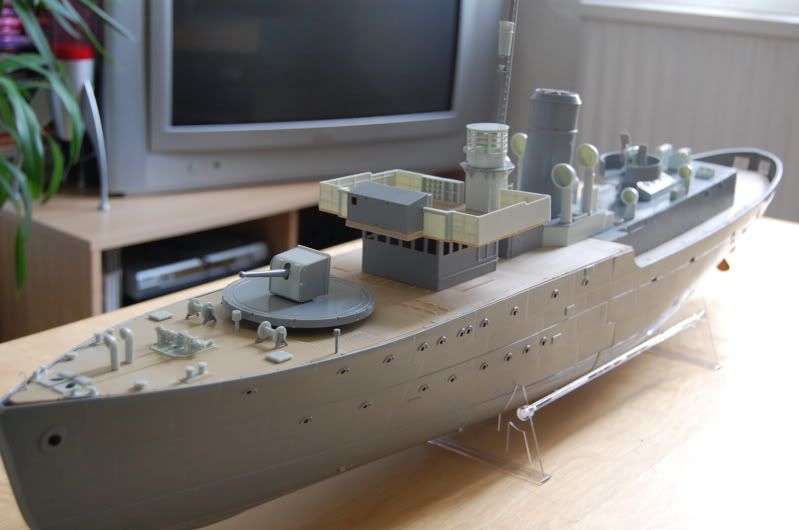

What it looks like with all the separate bits placed together. But still much more to assemble and add yet though!

As this is going to be a working model it is going to need some radio equipment. Here is a list of the bits:
Graupner Speed 400 (7.2v)
Mtroniks 'plug n play' Marine 20 ESC
Mtroniks 2300Mah 7.2v battery
Hitec HS-645MG servo (a bit OTT but is a spare from my nitro cars)
Spektrum DX5e radio set.

I am also using a pre-made Deans Marine prop shaft with oiler tube For the rudder I am going to use the existing plastic rudder with a brass rudder fitted inside.
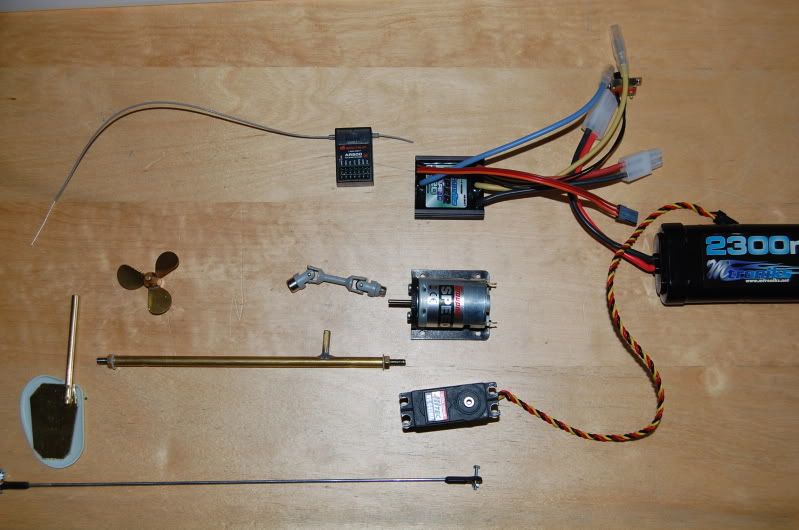


Anyway, that will do for now. I will take some more pictures of my progress tomorrow and that's when i will start asking some of the questions I already have!!
Logged

keef666

  • Guest
Re: Flower Corvette conversion by jonny shoreboy.
« Reply #1 on: April 07, 2009, 09:08:54 am »

the good old revell corvette, if i can remember mine, i used the kits rudder, plastic 40mm propeller, a 385 motor, viper 15amp and 6volt lead acid battery and using this means less lead needs to be added, plus you get around two hours running time, but post some more photos of you build, keith
Logged

Bunkerbarge

  • Full Mayhemer
  • *****
  • Offline Offline
  • Posts: 2,546
  • Location: Halifax, UK
Re: Flower Corvette conversion by jonny shoreboy.
« Reply #2 on: April 07, 2009, 12:05:46 pm »

Looking like a very nice build thread there Johnny.  Thanks for putting this together, it will almost certainly prove to be usefull to other members in the future as awell as simply interesting to us all.
Logged
"Dirty British coaster with a salt-caked smoke stack, Butting through the Channel in the mad March days"

jonny shoreboy

  • Guest
Re: Flower Corvette conversion by jonny shoreboy.
« Reply #3 on: April 07, 2009, 04:52:44 pm »

I still getting to grips with just how many bits of plastic I need to glue together to finish this kit. I am spending a lot of time sanding mold lines and joins, but hopefully it will all be worth it when it comes time to painting. As this is my first kit, I am going to just use all the plastic parts included in the kit, the exception being i have ordered some brass stanchions to replace all the plastic ones. I figured as a working model many of these would get broken if they were plastic. If I was to build a second one of these kits I would go a step further and replace more of the fiddly bits which i also reccon will get broken quite quickly.

But for now, it's on with the build!

At the weekend I sprayed the hull in a couple of coats of undercoat. Next I used some 5 minute epoxy to fix the prop shaft in place. I have never used it before, but I have used fibre glass a lot (on surfboards and on my jet ski's) and i must say I was surprised by how little the 5 minute epoxy actually smelt (not that I was sniffing it though..). It also didn't create much heat while curing which was my main concern. I was worried that being a plastic hull it might warp. I also used the 5 minute epoxy to glass in my brass rudder to the modified plastic one before fixing both halves together. It does need a bit of filling but i figured this had to be the strongest way to build a rudder.

I am also using some scrap balsa wood to make templates for my engine mounting shelf, servo shelf and a box to hold the battery. I will then build these all out of ply. I really want to get the radio gear in place ans sorted so I can start to finish putting the rest of the boat together.

BUT! as this is my first boat, I am going to take my time and make sure that everything is perfect before moving on to the next stage.

A few pictures for an update:


The rudder and brass prop.


Prop shaft in place. The engine is just there to make sure that the prop shaft was aligned properly.


The computer desk/dry dock.
Logged

number-1

  • Full Mayhemer
  • *****
  • Offline Offline
  • Posts: 110
  • Location: Bristol UK
Re: Flower Corvette conversion by jonny shoreboy.
« Reply #4 on: April 08, 2009, 09:34:49 pm »

Hi Jonny, thanks for sharing your build with us. To strengthen the hull joints on my corvette I used plasterers dry wall scrim covered with a thin layer of fibre glass resin, the hull did get warm when it cured but dos'nt seem to have come to any harm
cheers Les.
Logged

jonny shoreboy

  • Guest
Re: Flower Corvette conversion by jonny shoreboy.
« Reply #5 on: April 09, 2009, 02:56:13 pm »

@Les: Hi mate! It is your set of instructions I am using to build my Bluebell! I also got the pictures you sent me and from what I can see your quite a bit further along with your build then mine! Maybe this build log will help motivate you to get yours finished.

As for my build, there will be a slight delay in my progress as I'm away for the long weekend, then of to Texas for a couple of weeks after that. I do hope to have all the electrics in and bath tested before I go though. however this evenings plan is to continue gluing plastic bits together.
Logged

jonny shoreboy

  • Guest
Re: Flower Corvette conversion by jonny shoreboy.
« Reply #6 on: April 18, 2009, 04:52:31 pm »

Hi everyone,

Just a quick update on my progress. I have nearly finished building all the plastic bits for the boat and the only thing missing is brass stanchions to go around parts of the boat. Once these arrive and are in place I can then undercoat everything and think about painting and final assembly. The next step for me now though is to get all the r/c gear in place, tested and working so i can figure out how to assemble the rest of the boat to allow access to the working parts inside and keep it water proof.

However all this will have to wait for a couple of weeks as I'm away on holiday. I have added a couple of photos of the plastic kit with nearly all of the fittings added.


Logged

jonny shoreboy

  • Guest
Re: Flower Corvette conversion by jonny shoreboy.
« Reply #7 on: June 13, 2009, 12:27:17 pm »

Just a quick update on my progress.

I have now built all the plastic kit bits and added the brass stanchions. The stanchions are not really to scale but they will be a lot stronger then the plastic ones. I did use the kit plastic stanchions and railings behind the bridge and it was incredibly tricky and time consuming, and quite hard to keep straight. I have also had a chance to spry the hull with red below the water line and brushed a few test colours onto the hull. Unfortunately I don't think the water line is correct, I think it is a bit too low, not by much but I think it is about 10mm. The next stage for me though is to get some balsa wood to finally secure all the internal electrics so I can start gluing stuff in place. Oh and a test run in the bath...

Now for some pictures...


hull with water line spayed and colours on the hull.


Brass stanchions


Plastic rails
Logged

jonny shoreboy

  • Guest
Re: Flower Corvette conversion by jonny shoreboy.
« Reply #8 on: June 14, 2009, 07:43:49 pm »

Well I have been really busy this weekend working on my corvette. First off I finally put it in the bath to check for leaks. As most will know the hull is made up from 4 pieces. When I did the first float test today I had a couple of small leaks. To fix these I added more 5 minute epoxy to seal the hull completely. For any first time builders of this kit I highly recommend making sure all parts are well and truly sealed. i thought mine was and I have to admit I was surprised it leaked..

I also jerry rigged the electrics into the hull and the wife had a good laugh at me 'playing with my boat in the bath'.. {-)

Even with all the electrics in the boat I noticed that the whole thing does sit very high in the water and I remember people on other builds talking about how important it is to ballast this boat correctly and now I can see why. I intend to do this over the next couple of days because I won't to take it to the lake next weekend for her first sea trails...

I also managed to undercoat all of the superstructures ready for final assembly and painting. All in all quite a productive weekend for my first boat! I must say I was quite pleased when I had my boat moving around in the bath for the first time..


It floats!


Logged

Hencore

  • Guest
Re: Flower Corvette conversion by jonny shoreboy.
« Reply #9 on: June 15, 2009, 11:33:34 am »

Thanks for the update Jonny. She looks great and you've done a very nice clean build so far.

I'm also looking to build one of these, infact my kit should arrive today.

If possible could you forward on the instructions for the Bluebell please and also what size rudder and prop shaft did you use?

Thanks

Phil
Logged

DickyD

  • Full Mayhemer
  • *****
  • Offline Offline
  • Posts: 9,423
  • www.srcmbc.org.uk
  • Location: Southampton UK
    • SRCMBC
Re: Flower Corvette conversion by jonny shoreboy.
« Reply #10 on: June 15, 2009, 11:51:27 am »

Thanks for the update Jonny. She looks great and you've done a very nice clean build so far.

I'm also looking to build one of these, infact my kit should arrive today.

If possible could you forward on the instructions for the Bluebell please and also what size rudder and prop shaft did you use?

Thanks

Phil
This might be helpful

http://www.modelboatmayhem.co.uk/forum/index.php?topic=5226.msg51370#msg51370
Logged
Richard Solent Radio Controlled Model Boat Club http://www.srcmbc.org.uk

Hencore

  • Guest
Re: Flower Corvette conversion by jonny shoreboy.
« Reply #11 on: June 15, 2009, 01:43:25 pm »

Ah yes Richard, I'd seen your post before but forgot all about it.

Has the answers regarding the prop shaft length etc which is good.
Logged

jonny shoreboy

  • Guest
Re: Flower Corvette conversion by jonny shoreboy.
« Reply #12 on: June 15, 2009, 05:43:01 pm »

Any other questions please feel free to ask. This is my first build but i have already learned a lot already. I also have a second one of these ready to go as I am having so much fun building this one! The second one will have all the Sirmar fittings and hopefully more advanced electrics including sounds and smoke! I also have a u-boat model to build as a surface only model for them to chase! But that conversion looks a bit trickier...
Logged

warspite

  • Guest
Re: Flower Corvette conversion by jonny shoreboy.
« Reply #13 on: June 15, 2009, 07:45:53 pm »

 :-)) it all brings back memories, looks like you have even followed the paint scheme to the letter - I allways thought I had painted mine wrong all those years ago with BISCUIT at the front, will have to check the two booklets I have from the original kit - yep still got mine.

Mine differs from the original kit in that I was recommended to use the german 88 for the main gun as it was better detailed than the one supplied, with blue tach shaped to look like a canvas shroud, a bofors for the bandstand at the rear, again for the look, but I opted for Tamiya 1/35 50 browning for the bridge guns, over scale but looked alright at the time - you have a nice build there.  :-))
Logged

number-1

  • Full Mayhemer
  • *****
  • Offline Offline
  • Posts: 110
  • Location: Bristol UK
Re: Flower Corvette conversion by jonny shoreboy.
« Reply #14 on: June 16, 2009, 08:19:39 pm »

Hello Jonny, glad to see your getting on with your build, shamed to say I hav'nt touched my bluebell for quite awhile.
Have a look at great little ships website for super detailed parts for your next project.

Les.
Logged

jonny shoreboy

  • Guest
Re: Flower Corvette conversion by jonny shoreboy.
« Reply #15 on: June 19, 2009, 07:44:16 pm »

Hi everyone, just another quick update. This time it's paint. I am following the HMS Bluebell (matchbox version) paint scheme but have also taken a bit of artistic licence with some elements of the painting. My general plan is to paint the main parts (roughly) then go back and paint the finer details. I will add paint fading to main sections then finally I will try my hand at weathering.


Couple of overviews.

My attempt and painting wood.

Tried dry brushing a lighter colour over the base coat to give a faded effect.
Logged

jonny shoreboy

  • Guest
Re: Flower Corvette conversion by jonny shoreboy.
« Reply #16 on: June 20, 2009, 11:21:43 am »

Thanks Richard.  :-))

I did notice it the other day which was a little disappointing... <:(
I'm hoping to repaint the water line this weekend. My friend just dropped of a big roll of roofing lead which i am going to use as ballast.
Logged

jonny shoreboy

  • Guest
Re: Flower Corvette conversion by jonny shoreboy.
« Reply #17 on: June 22, 2009, 08:58:43 pm »

Thanks to Richard's (DickyD) keen eyes I have repainted the waterline of my HMS Bluebell. On almost every build i have seen of the corvette one of the things that comes up time and again is the importance of ballasting this model correctly, so getting the waterline correct is a good starting point!

Logged

Zed.

  • Guest
Re: Flower Corvette conversion by jonny shoreboy.
« Reply #18 on: June 22, 2009, 09:40:36 pm »

looking good :-)

when I finish my U boat I am going to get one of these to even out the hunter / hunted ratio O0


Rich.
Logged

Hencore

  • Guest
Re: Flower Corvette conversion by jonny shoreboy.
« Reply #19 on: June 23, 2009, 01:58:05 pm »

Jonny, I see you purchased a upgraded 4inch gun. Is it a Sirmar fitting? what's your impressions of it? The picture on their website shows a brass barrel but you are using the resin one? It doesn't appear that you have upgraded the pom pom? This gun is probably the worst one in the kit I think.
Logged

jonny shoreboy

  • Guest
Re: Flower Corvette conversion by jonny shoreboy.
« Reply #20 on: June 23, 2009, 02:14:56 pm »

Jonny, I see you purchased a upgraded 4inch gun. Is it a Sirmar fitting? what's your impressions of it? The picture on their website shows a brass barrel but you are using the resin one? It doesn't appear that you have upgraded the pom pom? This gun is probably the worst one in the kit I think.

Hi there,

I actually have all of the Sirmar resin fittings but I intend to use them on my other corvette. The 4" gun comes with both a square and rounded forward gun shield so I decided to use one on my first corvette. this is the only after market part I am using on this kit. It comes with the the barrel and shroud all moulded together and the remains of the kit are resin and white metal. Mine did not come with a brass barrel.

As for the pom pom it is pretty bad, but I have a few ideas to try and improve it a bit, but for me this first kit is just about getting a boat on the water.

Logged

jonny shoreboy

  • Guest
Re: Flower Corvette conversion by jonny shoreboy.
« Reply #21 on: November 11, 2009, 07:21:05 pm »

Work has restarted on HMS Bluebell. I dusted her off and make a 'to do' list for the next stages.

The first stage I need to complete is gluing the port-hole glass in place and sealing them with some resin.
Ballast the bottom of the hull so she sit at the correct on her waterline.
Permanently set up the electrics.
Star placing the deck pieces and work out my access and make sure it is water tight.
Glue together any remaining parts and start to weather the finished product.

Pictures to follow..
Logged

jonny shoreboy

  • Guest
Re: Flower Corvette conversion by jonny shoreboy.
« Reply #22 on: November 14, 2009, 10:11:43 pm »

O.k so the wife is watching T.V. so i took the opportunity to fill the bath up and get the boat wet. I needed to work out how much ballast I would need to get the boat to sit right in the water. As it turned out it took a lot. First off though I had to glue all the port-hole glass in. Clear plastic and glue are always a tricky thing as plastic cement tends to ruin clear plastic if your not careful. I think I may have got away with it. So armed with a boat with no holes in it I set about working out my ballast weights.

Now a lot of people who have already built this model have all mentioned that in is crucial to get the ballasting correct on this conversion. So I started by putting the boat in the bath. I then cut some strips of lead and added them to the boat until it sat at the correct level. In the end I added 2.1kg's of lead and the plastic decks and things and got it to sit right. 2.1kg's is quite a lot of lead. next step is to work out how much my radio gear weighs the subtract that form my 2.1kg's.

Anyway here's today pictures:


A boat in the bath.


HOW MUCH LEAD!! :o

Logged

Tug-Kenny RIP

  • Full Mayhemer
  • *****
  • Offline Offline
  • Posts: 7,625
  • Location: Newport. S Wales
Re: Flower Corvette conversion by jonny shoreboy.
« Reply #23 on: November 15, 2009, 04:18:50 pm »


Cannot see from the pictures where the water comes up too.  Is it the red line?  The illusion is that she is not sitting low enough.  ok2

You might find when everything is added that you wont need the lead, just a correct choice of battery.

Cheers

Ken


Logged
Despite the high cost of living   .......... It remains popular

Glyn

  • Full Mayhemer
  • *****
  • Offline Offline
  • Posts: 43
  • Model Boat Mayhem Forum is the Best!
  • Location: Centurion, Gauteng Province, South Africa
Re: Flower Corvette conversion by jonny shoreboy.
« Reply #24 on: November 16, 2009, 10:46:55 am »

Hi Johnny!
Your article has stirred up memories of my own building of the Matchbox corvette, back in 1979, which I built as HMS Bluebell. It was once motorised, changed hands for a few years, and eventually found its way back to me! Had to do a bit of restoration work on her and I have yet to finish the rigging. She is now a display model, befitting her 30 year vintage!
Looking forward to seeing more photographs as you continue your progress.
Regards, Glyn :-)
Logged
Pages: [1] 2 3   Go Up
 

Page created in 0.101 seconds with 24 queries.