Model Boat Mayhem

Please login or register.

Login with username, password and session length.
Pages: [1] 2   Go Down

Author Topic: Assurance Class Tug - Model Slipway - Build  (Read 19964 times)

montessa315

  • Full Mayhemer
  • *****
  • Offline Offline
  • Posts: 70
  • I should do it which way?
  • Location: Rugby, Warwickshire.
Assurance Class Tug - Model Slipway - Build
« on: October 18, 2012, 10:51:26 pm »

Right. let's try this again.

If you didn't want to see the build, there was not a need to wipe every-bodies post for a whole week. :D

This is it, my way of building the Model Slipway Assurance class tug.

I’m not building this as a replica of any particular boat, for the most it will be built as per instructions with the kit parts.  But some modifications will be made along the way, purely for physical appearance to my liking.  Not fully planned all the paint colours yet, but will be done to my own personal preference.

Hopefully, at the end, it will be a reasonable looking and working tug.

I picked the kit up with a few bits already started, including a fitted bow thruster.  I had plans to fit a bow thruster myself anyhow, just saved me the trouble.  The rudder and prop shaft had also been fitted.

I started this kit about four weeks ago, but did take pictures of most of the progress.  So the first few posts are going to be what already has been achieved.

So, on to what has been done.

The fitted original rudder.
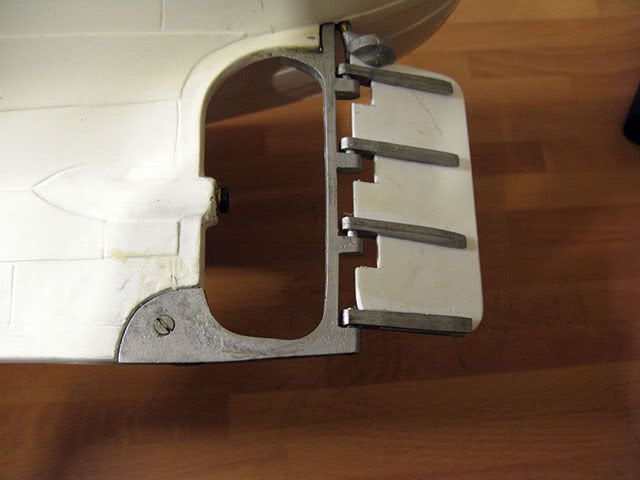


Now, I want a rudder that is removable.  So the first thing was to cut the old rudder out, leaving the bottom support in place.
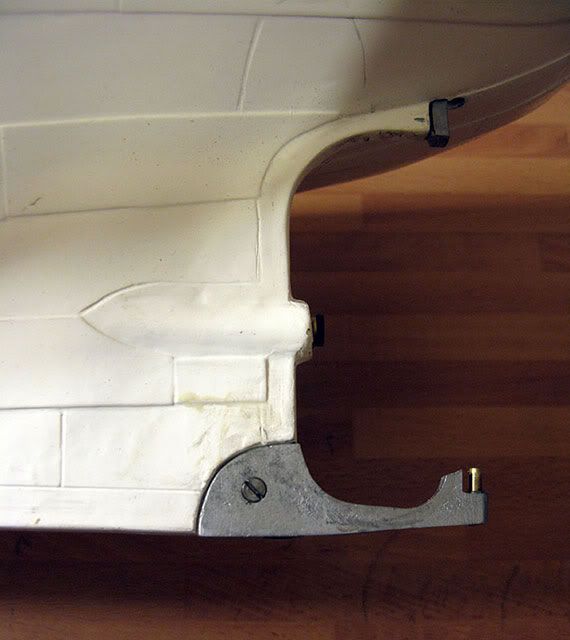


Next, was to remove the original top rudder support.
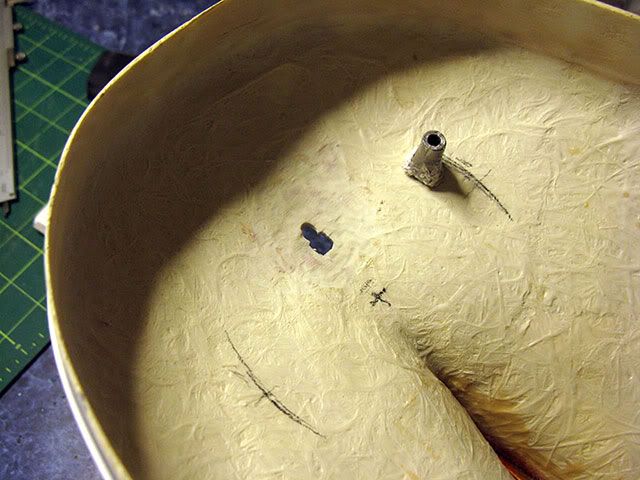


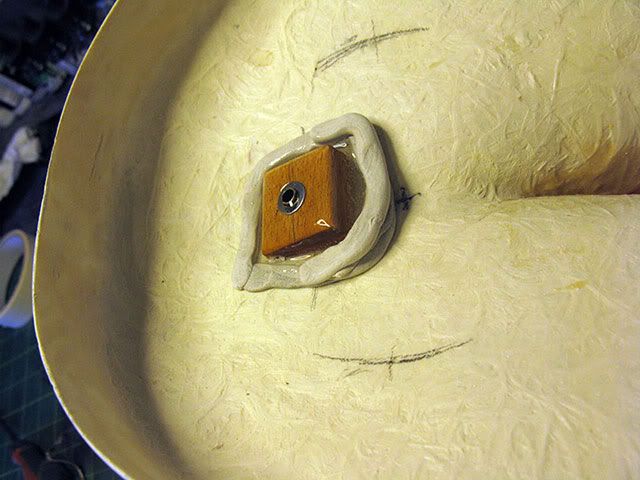
A bit of brass tube was then refitted in a wooden block for the top rudder support, aligning with the hole in the original bottom support.


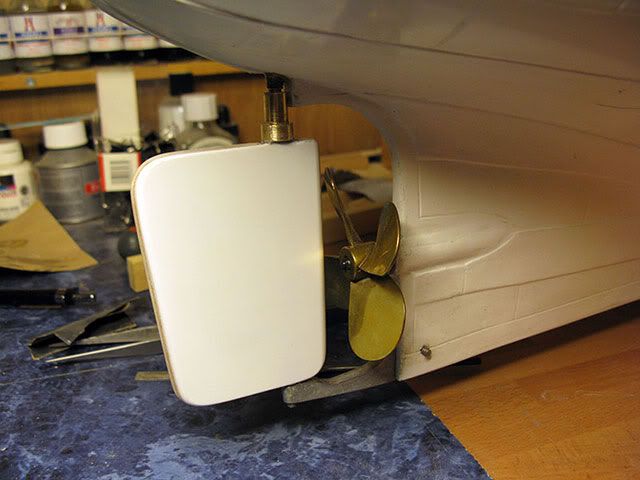
I then made a new rudder from 4mm ply, covered with 1mm plastic sheet.  A piece of brass tube with an old splined coupling (turned down) silver soldered to the brass tube was sandwiched into the rudder assembly.
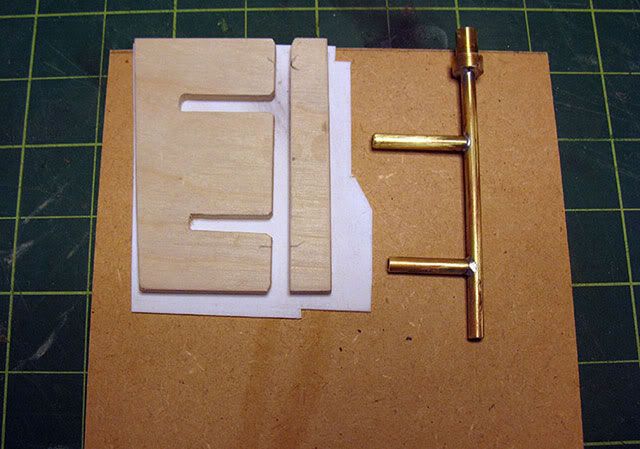


A stainless steel rod was dropped in from the top and the rudder secured to the rod via the grub screw in the old coupling.

One removable rudder.


Cheers

      Alan……………
Logged
If you always do what you've always done, you'll always get what you've always got.

montessa315

  • Full Mayhemer
  • *****
  • Offline Offline
  • Posts: 70
  • I should do it which way?
  • Location: Rugby, Warwickshire.
Re: Assurance Class Tug - Model Slipway - Build
« Reply #1 on: October 18, 2012, 10:56:02 pm »

Right, the next part I wanted to alter from what had already been done the prop shaft support.

The old one.


A new slightly stronger support added.


I then proceeded to cut out the front hull portholes.  This was done by drilling a 3mm hole and then opening up to the required size with a tapered reamer.


The rear of the hull had the open ports cut out, by chain drilling with a 2mm drill and then filing to final size.


Also glued on the boat skids on the side of the hull.


Then a motor mount was made from plywood and fitted, and a plywood sheet glued in the bottom of the hull.  Also glued in a mount for the rudder servo, low enough to avoid hitting the rear deck support braces.  The servo mount had to come out again later on because of another problem, which I’ll explain later.


The next phase was to fill and sand down smooth the inside of the gunwale.  Most of the filler was removed and the fibreglass sanded down smooth so anything glued onto the hull was being glued to the hull and not the filler.
The rear.


The front.


Cheers

      Alan………….
Logged
If you always do what you've always done, you'll always get what you've always got.

montessa315

  • Full Mayhemer
  • *****
  • Offline Offline
  • Posts: 70
  • I should do it which way?
  • Location: Rugby, Warwickshire.
Re: Assurance Class Tug - Model Slipway - Build
« Reply #2 on: October 18, 2012, 10:59:38 pm »

Next is the fitting of the deck supports, done as per instructions and with the supplied materials.

The front done.


The back done.


The rear deck was then to be fitted.  It was at this point I started to have problems.  The hull was distorted and needed spreading.  The rear deck by itself would not hold the hull apart without crumpling, and the rudder servo supports were stopping the hull from spreading.  So with the servo supports removed, a lot of heat from a hairdryer bought the hull very close to its right form.  To help it along I placed a couple of wood braces to hold the hull in shape.  A little bit of shaping to the deck around the aft curved section and the deck just dropped into place.  A great fit.
This is also where I have differed to the plans and made up a coaming around the rear two hatches.


It was at this time I also found out that spreading the hull to fit the deck had caused some movement in the top rudder post, so the rudder shaft was no longer in line with the bottom support hole, about 3mm out.  I suppose the proper way to remedy it would have been to remove the top support and redo it, but by slightly elongating the hole in the bottom support the rudder shaft now fits again and moves freely.

If I was to build another one, I think I would get the hull ready to take the decks and fit bracing supports in the hull before fitting anything internal.

The vertical wall at the front of the rear deck was then fitted with some added support for strength.


The engine room hatch cover basics were assembled.


Where I am also differing is on the rudder hatch assembly.  I wanted it to cover the whole back part.


Cheers

      Alan………………

Logged
If you always do what you've always done, you'll always get what you've always got.

montessa315

  • Full Mayhemer
  • *****
  • Offline Offline
  • Posts: 70
  • I should do it which way?
  • Location: Rugby, Warwickshire.
Re: Assurance Class Tug - Model Slipway - Build
« Reply #3 on: October 18, 2012, 11:03:15 pm »

Some more catching up.

The engine room cover hatch had a couple of stiffeners added internally, as well as the port holes drilled out.


I wanted the option of the tug being capable of some light towing, so put in some support for the tow hook.
Some box section plastic was glued to the deck to help retain the shape and strengthen the deck area because of the hole cut out for the tow hook support.  The box section is also there for gluing the tow hook structure to, as I planned on painting the structure before gluing down.


The tow hook structure made and sitting in place.


The tow hook backing plate screwed into place with brass screws.


Tow hook components cleaned up and sitting in place.


Cheers

         Alan……………………..
Logged
If you always do what you've always done, you'll always get what you've always got.

montessa315

  • Full Mayhemer
  • *****
  • Offline Offline
  • Posts: 70
  • I should do it which way?
  • Location: Rugby, Warwickshire.
Re: Assurance Class Tug - Model Slipway - Build
« Reply #4 on: October 18, 2012, 11:06:56 pm »

The bulwark supports were glued into place using an engineer’s square to keep them perpendicular to the deck and at right angles to the bulwark.


Once the supports were in place, they were sanded level with the top of the bulwark and the topping strips added.

At this point, the rear deck and tow hook structure was painted.  Makes easier access for painting before getting the front deck on.


While leaving the paint to dry, I made up the wooden lattice work that I want to cover the rudder hatch with.
A card board template was made of the hatch cover, the wood work layout then drawn onto it.  The bottom support beams were stuck to the card board with small bits of double sided tape, then the tops strips were glued on using a piece of brass rod for the spacing.


The lattice work sitting in place on the hatch cover.


The rudder hatch cover was sprayed black, the tow rope storage box was made and sprayed at the same time.  The wooden lattice work was given a coat of varnish.


The completed rudder hatch cover.


Cheers


      Alan………………….
Logged
If you always do what you've always done, you'll always get what you've always got.

montessa315

  • Full Mayhemer
  • *****
  • Offline Offline
  • Posts: 70
  • I should do it which way?
  • Location: Rugby, Warwickshire.
Re: Assurance Class Tug - Model Slipway - Build
« Reply #5 on: October 18, 2012, 11:10:26 pm »

The tow rope storage box was also competed using wood strips.  The support beams were glued direct to the painted plastic box and given a thin coat of varnish.  Then the planks were glued on top, again using a piece of brass rod for the spacing.


Wooden planking finished.


And varnished.


Before fitting the front deck, I wanted to fit some lights for the front hull port holes.  A length of angle plastic was screwed inside the hull onto a couple of wooden blocks.  Then the plastic angle was drilled to take the legs of the LED’s, which were bent over underneath to hold them in place.


The wiring was brought to a single point and soldered to a small piece of strip board with a screw terminal block on it for the power supply.  2 off LED’s were also fitted to light up the deck area under the front deck by the tow hook structure.  These 2 off LED’s had there tops sanded down and a higher capacity resister fitted to subdue the light.


While I was at it, some LED’s were also fitted the same way below the engine cover hatch and again soldered to a small piece of strip board with a screw terminal block.


Thanks


      Alan…………………..
Logged
If you always do what you've always done, you'll always get what you've always got.

montessa315

  • Full Mayhemer
  • *****
  • Offline Offline
  • Posts: 70
  • I should do it which way?
  • Location: Rugby, Warwickshire.
Re: Assurance Class Tug - Model Slipway - Build
« Reply #6 on: October 18, 2012, 11:12:56 pm »

Time to get the front deck fitted.
Just some final shaping around the hull bow curve.
Clamped, taped and weighted.


Sometime while fitting the front deck, the front coaming snapped and became angled instead of its original curve.  I’ll look into that when I start the front cabins.
All clamping removed.


The tow hook assembly was painted, the hook support rings glued in place and the hook loosely fitted.


The front deck has had filler applied where needed and is now ready to be sanded down.

This is the point I am at this moment in time.  So from now on posts will be a lot slower as the progress happens in real time.


Thanks

      Alan…………………..
Logged
If you always do what you've always done, you'll always get what you've always got.

RAAArtyGunner

  • Full Mayhemer
  • *****
  • Offline Offline
  • Posts: 3,816
  • Location: Brisbane, Australia
Re: Assurance Class Tug - Model Slipway - Build
« Reply #7 on: October 19, 2012, 10:53:34 am »

Alan,

Now that you mention it, yes, that's when the meltdown occurred.
How did you do it {-) {-)
Am now able to re bookmark your build, as it disapeeared before.
Logged
Gunna build those other boats one day.

montessa315

  • Full Mayhemer
  • *****
  • Offline Offline
  • Posts: 70
  • I should do it which way?
  • Location: Rugby, Warwickshire.
Re: Assurance Class Tug - Model Slipway - Build
« Reply #8 on: October 19, 2012, 09:23:02 pm »

Alan,

Now that you mention it, yes, that's when the meltdown occurred.
How did you do it {-) {-)


Wish I new how I did it, wouldn't have been so stupid and took my own posts with it..... <:( 


                             Alan..................
Logged
If you always do what you've always done, you'll always get what you've always got.

Stormbringer

  • Full Mayhemer
  • *****
  • Offline Offline
  • Posts: 430
  • Location: S.Queensferry Scotland
Re: Assurance Class Tug - Model Slipway - Build
« Reply #9 on: October 20, 2012, 12:51:02 am »

making good progress there and looking good so far  :-))
Logged

Tim B.

  • Full Mayhemer
  • *****
  • Offline Offline
  • Posts: 182
  • Location: Oakland California
Re: Assurance Class Tug - Model Slipway - Build
« Reply #10 on: October 20, 2012, 03:29:34 am »

Excellent work !
I will learn from you as I build mine.

Tim
Logged

montessa315

  • Full Mayhemer
  • *****
  • Offline Offline
  • Posts: 70
  • I should do it which way?
  • Location: Rugby, Warwickshire.
Re: Assurance Class Tug - Model Slipway - Build
« Reply #11 on: October 20, 2012, 10:16:15 am »

Thanks Stormbringer, just hope I can keep it going.

Cheers Tim.  I read through your build and Spooks before I started and both have already been helpful.
As from learning from me, I'm hoping your build is going to stay in front of me so I can learn from you.  Most definitely have not got the patience to add the very small detail that you have already done.
Will be following your build.


Thanks

                    Alan...............
Logged
If you always do what you've always done, you'll always get what you've always got.

montessa315

  • Full Mayhemer
  • *****
  • Offline Offline
  • Posts: 70
  • I should do it which way?
  • Location: Rugby, Warwickshire.
Re: Assurance Class Tug - Model Slipway - Build
« Reply #12 on: October 20, 2012, 10:03:05 pm »

A small amount of progress has been made.
The front deck was marked out for the anchor chain pipe holes, drilled with a 3mm drill and then opened up for fitment of some 8mm OD. Pipe with a tapered reamer.  The reamer was angled as much as possible towards where the holes will be in the hull.


As centrally as I could get it, 3mm holes were drilled in the hull side for the anchor chain pipe.


These were then opened up to 10mm with the tapered reamer, again angling towards the holes in the deck.


Test fitting of the 8mm pipe in the deck.


And connected with the 10mm pipe through the hull.


Then a shorter piece of 8mm and 10mm pipe were glued together.


The pipe was fitted with plastic liquid cement on the deck and a run of medium super glue used around the pipe on the hull, and zapped with activator to form a fill.


Thanks

      Alan……………………
Logged
If you always do what you've always done, you'll always get what you've always got.

montessa315

  • Full Mayhemer
  • *****
  • Offline Offline
  • Posts: 70
  • I should do it which way?
  • Location: Rugby, Warwickshire.
Re: Assurance Class Tug - Model Slipway - Build
« Reply #13 on: October 20, 2012, 10:06:55 pm »

Once all the glue had dried on the deck and pipes, the pipes were roughly cut down and sanded flat.


With the chain pipe covers loosely in place.


The hull side chain pipes cut down, sanded and final fill.


A small piece of wood was squared up for fitting of the front bulwark supports.


The front bulwark topping plate glued on.  The supplied top bow plate was not the right shape.


So a template was made out of cardboard and a new one cut out.


The new top bow plate has been fitted and the bulwark topping plate has been filled around the outside.  Once the filler has dried it will be time to sand down.

Thanks

      Alan………………
Logged
If you always do what you've always done, you'll always get what you've always got.

Tim B.

  • Full Mayhemer
  • *****
  • Offline Offline
  • Posts: 182
  • Location: Oakland California
Re: Assurance Class Tug - Model Slipway - Build
« Reply #14 on: October 21, 2012, 07:16:08 pm »

Outstanding job, rather clever how you've done the chain pipe, that sort of fussy work is out of my scope.
Logged

montessa315

  • Full Mayhemer
  • *****
  • Offline Offline
  • Posts: 70
  • I should do it which way?
  • Location: Rugby, Warwickshire.
Re: Assurance Class Tug - Model Slipway - Build
« Reply #15 on: October 24, 2012, 10:10:27 pm »

Outstanding job, rather clever how you've done the chain pipe, that sort of fussy work is out of my scope.

Cheers Tim.

Have done something similar on an old Billings Samsung, keeps the hull watertight and gives me the option of having the anchors working.


                    Alan.................
Logged
If you always do what you've always done, you'll always get what you've always got.

montessa315

  • Full Mayhemer
  • *****
  • Offline Offline
  • Posts: 70
  • I should do it which way?
  • Location: Rugby, Warwickshire.
Re: Assurance Class Tug - Model Slipway - Build
« Reply #16 on: October 24, 2012, 10:17:31 pm »

The front bulwark topping plate to hull has all been sanded down.  That now leaves the hull ready to be painted.  On holiday next week so hope to get that sorted then.


In the meantime, I have started on the front removable hatch and superstructure.
First is the stiffeners fitted underneath the hatch.


Then it was the fitting of the superstructure cross bulkhead.  Here the camber of my deck is slightly different to the supplied bulkhead.


So three choices. 
1.    Reshape the curve on the original bulkhead, but that would then leave it slightly shorter than the side pieces, so no go.
2.   Add some small cut-outs to fill the gaps, fiddly and time consuming.
3.   Cut a new one to fit.  Which is what I did.

Just drew around the original on some card, leaving extra to fit the deck, once satisfied, cut a new bulkhead from plastic sheet.


Glued the new cross bulkhead to the hatch cover with plastic cement, using the wheel house side panels to get the right angle.  A few spots of super glue with Activator and masking tape to hold it in place until dry.  The square section wood and clamps making sure it stays straight.


Once the cross bulkhead was dry, the superstructure main former was glued into place.


Thanks

      Alan………….
Logged
If you always do what you've always done, you'll always get what you've always got.

montessa315

  • Full Mayhemer
  • *****
  • Offline Offline
  • Posts: 70
  • I should do it which way?
  • Location: Rugby, Warwickshire.
Re: Assurance Class Tug - Model Slipway - Build
« Reply #17 on: October 29, 2012, 11:09:53 am »

 A bit more progress on the superstructure.
MS suggest fitting the superstructure front piece next, but that only gives you the thin edge of the main former to glue to and nothing to align against for vertical positioning.
So I decided to fit the superstructure side parts first, already drilled for the portholes.


Once the side parts were dry, I then fitted the superstructure front piece and held in place with masking tape.


Superstructure front piece nicely fitted in.


As I intend to put a couple of LED’s behind the side portholes I just glued in a couple of baffles to help keep the light concentrated behind the portholes.


The wheelhouse deck was then glued into place, taped and weighted.
As Martin didn’t think my battery placement on the rear of the front deck was the ideal place, I thought I try them out on top of the wheelhouse deck instead to see if I could get a better balance. :} :} :}


The wheelhouse deck in place, and the back edge all cleaned up


The wheel house sides are not the best of fits, which I have seen somebody else have the same problem.


I already have a cunning plan  ok2 to correct the wheel house sides and will explain it as I get on with it.
 
 
Thanks
 
                                Alan……………………
 
Logged
If you always do what you've always done, you'll always get what you've always got.

montessa315

  • Full Mayhemer
  • *****
  • Offline Offline
  • Posts: 70
  • I should do it which way?
  • Location: Rugby, Warwickshire.
Re: Assurance Class Tug - Model Slipway - Build
« Reply #18 on: October 29, 2012, 11:22:28 am »

 While the glue was drying on the putting together of the superstructure, I made a start on the rear hold hatch.  First the base was glued together.


Instead of using the plastic parts for the planking in the hold hatch cover, I used a piece of 1.5mm plywood.
To get the correct shape, some Tamiya masking tape was put in the white metal hatch cover.


Then trimmed with a scalpel.


The masking tape was then removed as a whole and re-stuck onto a piece of plywood.


Cut to shape and test fitted in the metal cover.


3mm holes drilled, which will have the etched brass hatch lifting rings glued too later.  Plank widths all marked out.


Planks cut and sitting in cover.


Masking tape removed.  This is when I noticed I had put the tape on the wrong way for the wood grain.  But never mind, not going to lose any sleep over it.


The base has also been filled on the joints with some gloop, (plastic melted in plastic cement) and waiting to be cleaned up.


All up to date with progress so far, more to come as I get on with it.
 
 
Thanks
 
                                Alan……………..
 
Logged
If you always do what you've always done, you'll always get what you've always got.

Tim B.

  • Full Mayhemer
  • *****
  • Offline Offline
  • Posts: 182
  • Location: Oakland California
Re: Assurance Class Tug - Model Slipway - Build
« Reply #19 on: October 29, 2012, 05:48:15 pm »

You've passed me up on my build !
 
I will have to catch up.
Logged

montessa315

  • Full Mayhemer
  • *****
  • Offline Offline
  • Posts: 70
  • I should do it which way?
  • Location: Rugby, Warwickshire.
Re: Assurance Class Tug - Model Slipway - Build
« Reply #20 on: October 29, 2012, 07:14:00 pm »

You've passed me up on my build !
 
I will have to catch up.

Not a problem, I can slow down.   :P
Logged
If you always do what you've always done, you'll always get what you've always got.

montessa315

  • Full Mayhemer
  • *****
  • Offline Offline
  • Posts: 70
  • I should do it which way?
  • Location: Rugby, Warwickshire.
Re: Assurance Class Tug - Model Slipway - Build
« Reply #21 on: October 30, 2012, 10:28:16 pm »

 Well, I have now managed to have a look at sorting out the wheelhouse side panels.
First I clamped a piece of wood to the back of the panel to keep it straight, then placed the panel in position sitting tightly up against the superstructure back panel.  Then using a drawing compass, (with the metal point reversed), set the compass to the bottom of the panel at the point of the biggest gap.  Keeping the compass at the same angle, proceeded to draw a line along the bottom of the wheelhouse side panel, then without altering the compass, also draw a line along the bottom part that fits to the deck.


The wheelhouse side panel with both lines drawn.


After cutting along the lines, a pretty good fit.


I then did the same thing for the right hand wheelhouse panel, nearly as good.
I also had to trim down the top of the right hand wheelhouse panel by about a 1mm to get it to be the same height as the left hand side.


I loosely assembled the 4 off wheelhouse panels together with tape and marked out on the deck and superstructure where everything has got to be glued.  The decision is to glue it together in stages.  So 1 off side panel and the rear wheelhouse panel was held in position on the boat and taped together, then glued while supported on the bench.


Those 2 off panels have then been glued to the superstructure and deck using the before mentioned positioning marks.


Once they are fully dry tomorrow, I will see if my method has worked, and proceed to glue on the other wheelhouse side panel and front panel.
 
Thanks
 
                                Alan……………..
 
Logged
If you always do what you've always done, you'll always get what you've always got.

montessa315

  • Full Mayhemer
  • *****
  • Offline Offline
  • Posts: 70
  • I should do it which way?
  • Location: Rugby, Warwickshire.
Re: Assurance Class Tug - Model Slipway - Build
« Reply #22 on: November 01, 2012, 09:13:17 pm »

 Well, not had nowhere near the amount of time I hoping for to get on with the build, but did find a little bit.
Removed the tape holding the wheelhouse side and back on, stuck nice and firm.


Stuck on the other side and the front piece, with no problems at all.  Lined up great.  Only difference to the instructions is that I kept the front of the wheelhouse straight and not slightly rounded.


The wheelhouse former I decided to stick to the roof, so the continuous removal and refitting until permanently stuck down means it always fits in the same place.


The basics of the superstructure and wheelhouse done.
Just need to now look at sanding down the joints.


As lights are going to be fitted in the wheelhouse front and back for the portholes, of different colours, I made and fitted a wall partition.


One thing I did forget earlier, that to help the front forward hatch sit better, a couple of extra securing tabs were made and fitted, which really do help to keep the hatch curved.


I do intend for some basic furniture to be fitted in the wheelhouse, so off to find out what would be in there.
 
Thanks
 
                                Alan………………
 
Logged
If you always do what you've always done, you'll always get what you've always got.

Tim B.

  • Full Mayhemer
  • *****
  • Offline Offline
  • Posts: 182
  • Location: Oakland California
Re: Assurance Class Tug - Model Slipway - Build
« Reply #23 on: November 02, 2012, 12:55:12 am »

I have a pic of the interior of the bridge...
 
But for whatever reason I am no longer able to post pictures on this website  >:-o
Logged

montessa315

  • Full Mayhemer
  • *****
  • Offline Offline
  • Posts: 70
  • I should do it which way?
  • Location: Rugby, Warwickshire.
Re: Assurance Class Tug - Model Slipway - Build
« Reply #24 on: November 02, 2012, 09:24:54 am »

Thank you Tim, I'll PM in a minute.

I'm sure you'll get the picture posting sorted eventually.


      Alan....................
Logged
If you always do what you've always done, you'll always get what you've always got.
Pages: [1] 2   Go Up
 

Page created in 0.092 seconds with 22 queries.