|
Commodore - this is only my second model boat, ( my first, an old
balsa wood, scratch built steam tug, can be seen in my photo album
below )
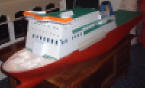
The reason I choose to build a
ferry was simple. I was into train sets for many years but a resent
extension to the house saw the dismantling of the train layout, and
then I lost interest in rebuilding it. So I had a lot of 1/72 cars
lying around and decided that a ferry was needed to display them on.
But which ferry, it had to be and open deck and sea going ferry in
order to get as many cars on display as possible. So I went online to
do a search and when I had narrowed my choices down to 5 ships I
emailed all 5 companies responsible for building the real ships asking
for plans. Only one company decided I wasn't a terrorist and replied
to my email that a set of plans was already in the post.
I was only expecting one or two pages with minimum details of the ship
so when the envelope arrived and contained about twenty A1 sheets with
every little detail on them I was over the moon, to buy a complete set
of plans like these would probably have cost a lot of hard earned cash
but these had only cost the nerve to just ask for them. The plans
where in a few different scales from 1/50 to 1/250 so I choose which
ones I needed and had them photocopied to 1/72 now I was ready to
stare in shock at how big this model was going to be.
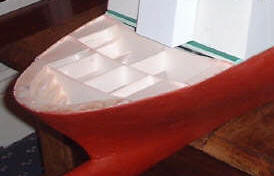
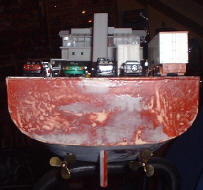
Next I had to decide how to build it. I had only ever built one boat
before this and it was a plank on frame boat of my own design and I
discovered that using wood was not my best skill. I had a lot of
mounting board (1mm thick cardboard) lying around the house so I
figured what the hell try that if it doesn’t work it would have cost
nothing. So from the enlarged line drawing of the hull I traced all 22
bulkheads on to the mounting board and cut them out adjusting for the
thickness of the 1mm planking the bulkheads where joined one at a time
using cardboard spacers the bow was made using the bread and butter
method then the whole lot was planked with the same card board, then
coated in fibreglass resin outside and varnish inside then filled and
sanded until I was happy with the finish.
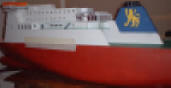
Next came the main car deck and superstructure made from a plastic
called Foamex, its strong and easy to cut. The deck itself was made
from 5mm thick Foamex to support the weight of the diecast cars while
the rest was made from 3mm thick Foamex. Each window was cut by hand
and glazed with 1.5mm thick Perspex a lot of blisters later most of
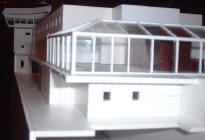
the main structure was finished. Now it was time to make the bridge
and what I and most of the club members are calling it the
conservatory on the back. They where both made from the same 1.5mm
Perspex and the strips of styrene glued on for the window frames.
Now I needed to get some prop
shafts in before I could paint the hull so a quick trip to the hobby
shop for just prop shafts and only prop shafts was made. So in I go to
buy only the prop shafts and I come out with just the prop shafts..
and the props and 2 speed controllers and two motors and a new
receiver and all the wires to connect the lot together, how does that
happen every time I go in to that place.
I decided to fit the motors
directly to the prop shafts cause I taught I would need all the power
I could get and didn't need gear boxes (how wrong was I) remember this
is only my second boat and it being on the large side I was thinking
that the two little motors will hardly manage to push this hulk along
in the water. Anyway in went the two Graupner 700 BB turbo motors and
their Hitec sp-520 plus speed controllers plus the batteries then I
made one rudder and made a mould of it so I didn't have to make the
other one identical. I cast the rudders in resin, made rudder shafts
connected the lot up to a servo and got it ready for the first bathtub
test.
I had to fill the bath right up to the top otherwise the boat wouldn't
fit in cause of that slope at the back of the bath. I gently lowered
the hull into the water and checked to see none was leaking in then I
switched it on ready for the test. I stood back picked up the radio
and push it to full throttle...........
"Never in my life have I seen so much water ejected from a bathtub so
fast, with in the space of 3 seconds half the contents of the bath had
exploded out all over the idiot standing at the back holding the
radio." After everything was dried off I decided maybe the
lake was a better place to test the props in future.
I was surprised at how heavy the model was with all the ballast and
the two motorbike batteries and was thinking these motors will never
push this model. So after showing it off to all the club members for a
while I lowered it into the lake and slowly sailed it away from the
edge. After slowly sailing it around for a while it was time to see
just how fast these tiny motors could make it go so I pushed the
throttle up full and this time no big splash, instead the bow lifted
up out of the water and the model shot across the water like a small
speed boat. The resulting wake nearly capsized other smaller boats in
the lake, but at least the members of the club had a good laugh
watching a ferry skip across the waves.
The model is still not finished but so far I have learned a lot about
boats from it. The speed controllers have been turned down to their
lowest and I still have to keep an eye on my trigger finger so as not
to go to fast. I have also learned to fix the cars on probably as most
of the first lot are resting at the bottom of the lake.
Well I’m still building and learning and will add more photos to my
album as I go.
While we at it, here's a tip for all you budding boat builders with
no understanding girlfriends/wifes.....Name your first boat after her
she will think you must really love her and think about her all the
time even when you are spending most of it with your boat.
Luke Neary
|