|
|
|||||
|
|||||
|
|
|||||
|
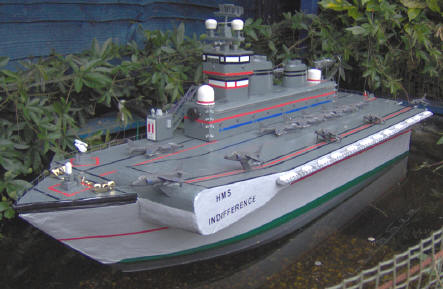
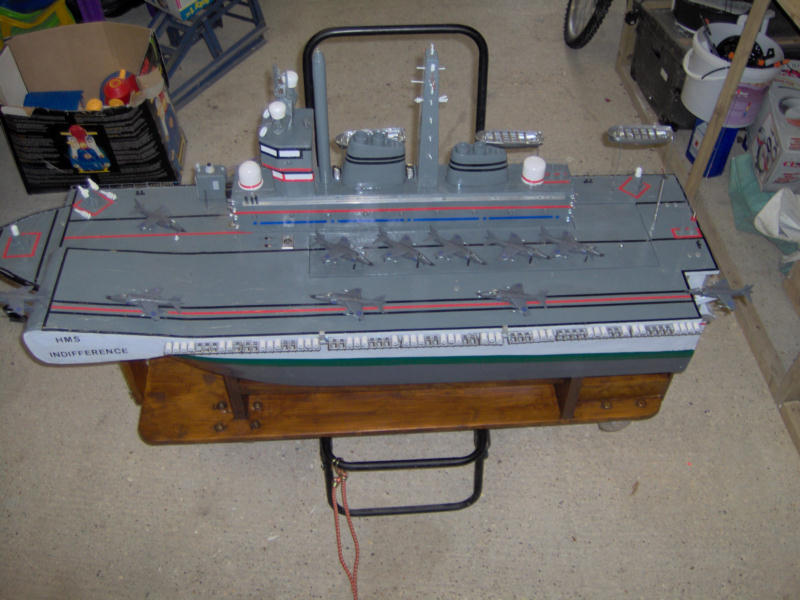
HMS Indifference –
my own version of HMS Invincible
Hull
Other dimensions
Working functions |
|||||
|
|
|||||
|
The Inspiration It was a cold blustery winters morning when I visited our local boating club at Aylesbury. I had taken my home made airboat ’Mandalay’ with me and it was going where it felt like because of the strong winds. What I need, I thought, was something more solid in the water. Back in work the following day and my colleague was talking about his son’s adventures on HMS Invincible. And so the seed was sown. I will build a look-alike HMS Invincible. I scoured the internet for days for photographs of the aircraft carrier and decided on six that showed all angles of the ship.
The Basic Research
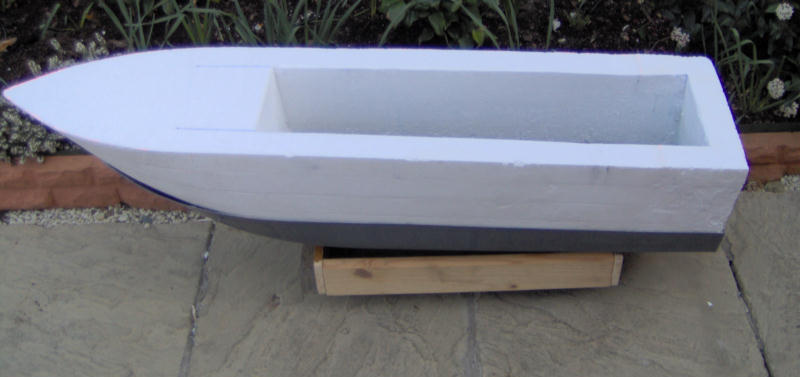
I spotted a basic hull, made from
fibreglass, four foot long by sixteen inches wide, with a start price of
£29.00. As I did not fancy bidding I contacted the seller direct and asked
him how much to buy direct from him. He said for £40.00 he would make one
twice as thick and in battleship grey, with £10.00 postage. It would take
70lb inside before it sank. Sound as a pound. It was ordered, paid for and
duly arrived early March 2005. |
|||||
|
|
|||||
|
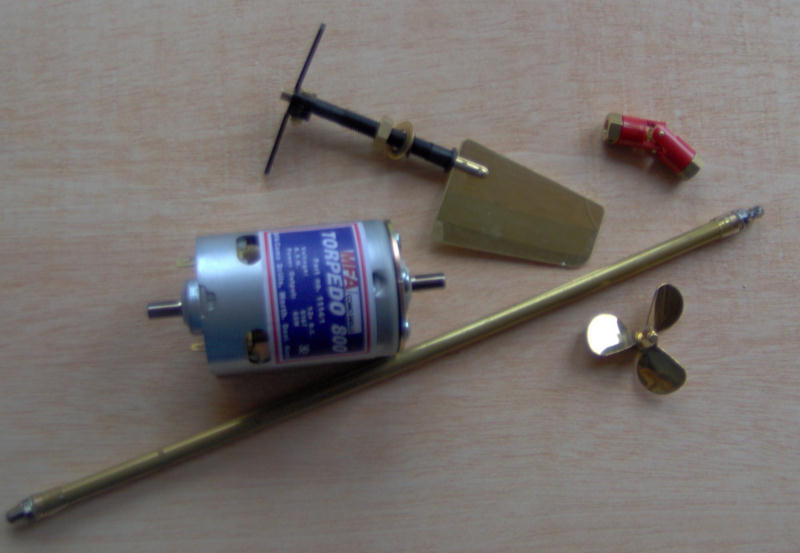
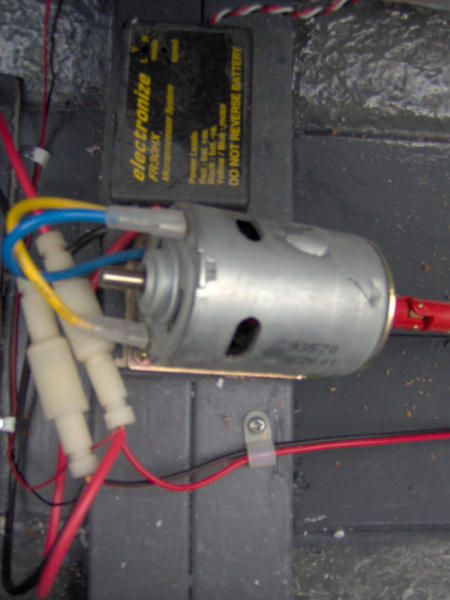
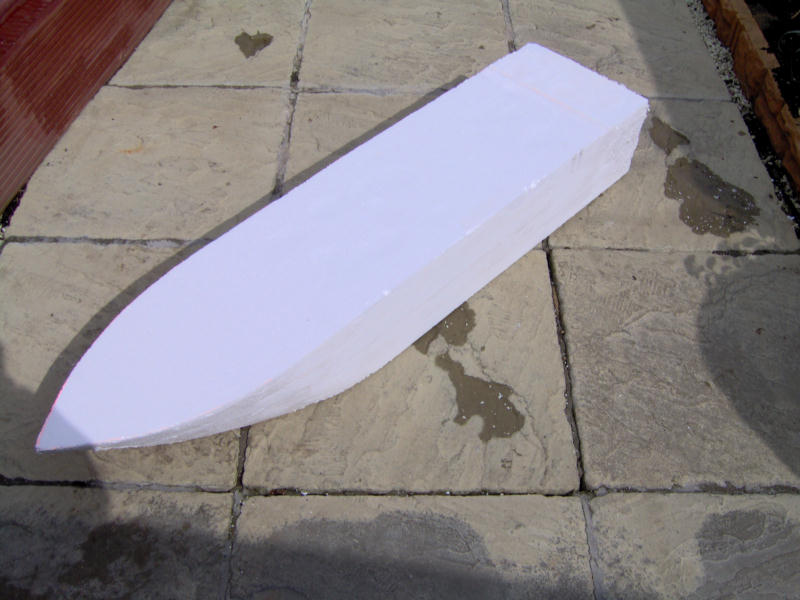
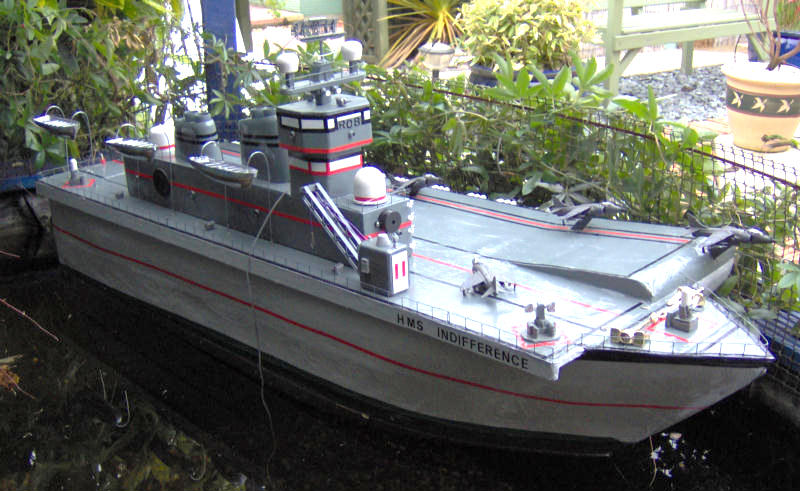
When the hull arrived I fitted the prop shaft, rudder, servo, speed controller and motor. The receiver was fitted to a battery and the motor and servo were checked for correct operation. Then I cut the foam so each piece overlapped the piece below by two inches at the front, with a perfect fit all round for the bottom piece to fit inside the hull by an inch (25mm). After the four layers were glued together the ship was now fifty six inches long – perfect. The front of the hull was shaped to follow the same angle as the fibreglass hull. The whole of the polystyrene part of the hull was coated with 50/50 building adhesive/water, then papered with brown paper and coated on top again with adhesive/water. This gave a real solid finish. When it was cured for a few days it was rubbed down with a fine sanding block. Finally, it was fitted inside the hull and epoxy glued. The whole thing was then primed with grey primer/undercoat and glossed with normal light grey high gloss paint. Time to check this all out.
I tried floating it in my garden pond and
found it was too high in the water. Out with the lead flashing and, after
twenty pounds had been added she sat just right. Off to the local lake
next to test it. In the water it went and dwarfed the one metre yachts
that were sailing. Someone said, ‘What is it going to be?’ I replied,
‘HMS Invincible’. This was met with comments like, ‘Invincible hasn’t got
this, hasn’t got that and does not have a hull shape like that either’. So
what, I thought, it’s my ship and her real name now is HMS Indifference.
And so it was, she was named and I was under no more pressure to make it
exactly like others wanted me to. She performed magnificently. Her bow
waves were as real as they get and the wash was the same. So home we
returned – contented. |
|||||
|
|
|||||
|
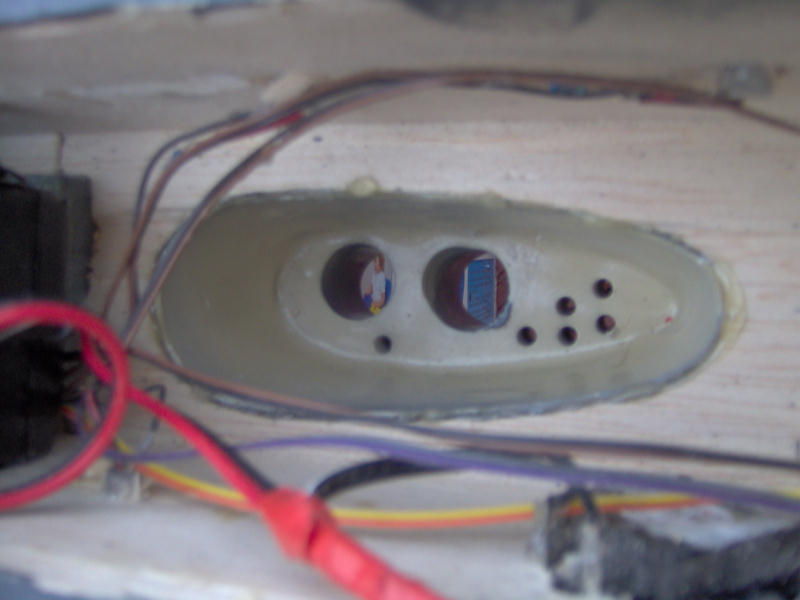
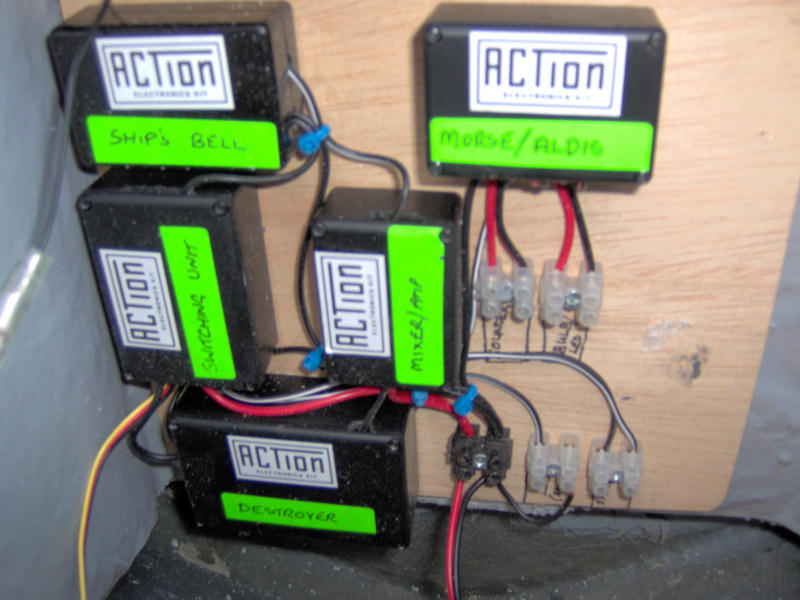
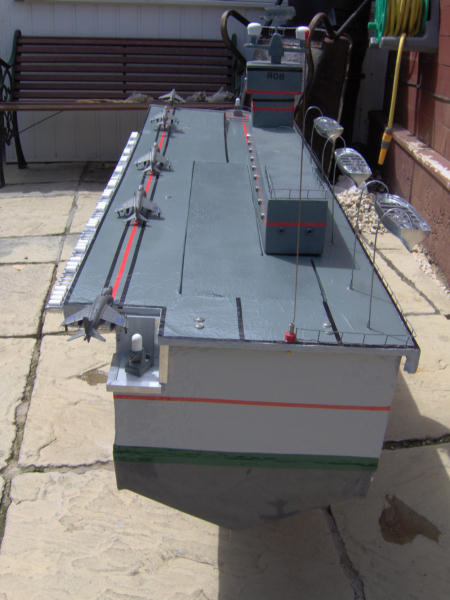
As I wanted all this to run from one channel I also bought a four way latching switcher and a Mixer/Amplifier, attached to a three inch speaker. All of this was supplied by ActionKit. The next couple of weeks were spent making the distribution board, wiring everything up and adjusting tones and testing. It all worked no problem. Next it was time to think about building the deck. I decided on using 6mm plywood for the main deck. It was also made so that it would be fitted with screws so that in the future I could use the hull and change the top for something different. The basic size was made, overhanging on one side. The wood was sealed with water resistant Cuprinol then an access hole was cut out to allow full access to all workings and for battery installation, etc. The launch ramp was made from shaped polystyrene and a strip of polystyrene was made to go under the overhang. Then the whole deck was painted with 50/50 building adhesive/water, papered with brown paper and coated again with the adhesive water to give a solid finish., When it was dry it was rubbed down with fine sand paper to a smooth finish. It was then primed, undercoated and sprayed with Plasticote grey, to give long lasting protection. Nothing is going to get at my deck!! |
|||||
|
|
|||||
|
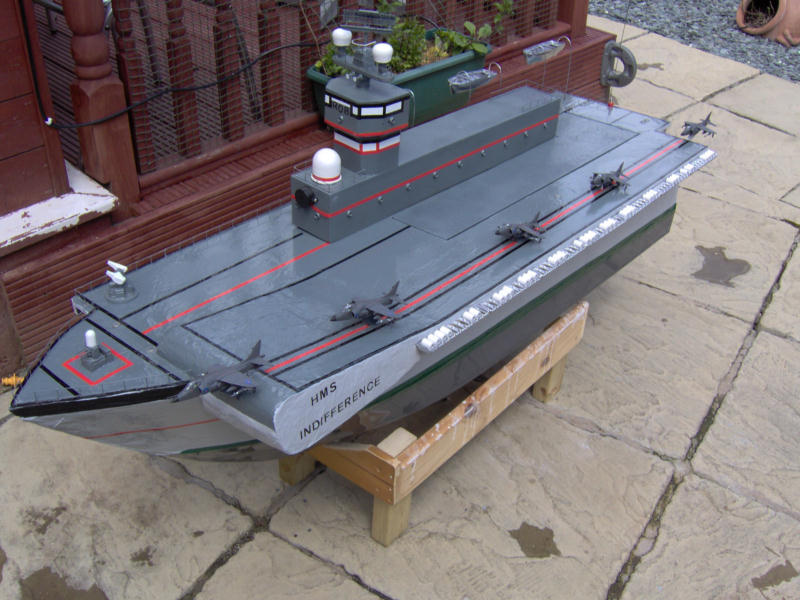
Deck buildings
|
|||||
|
|
|||||
|
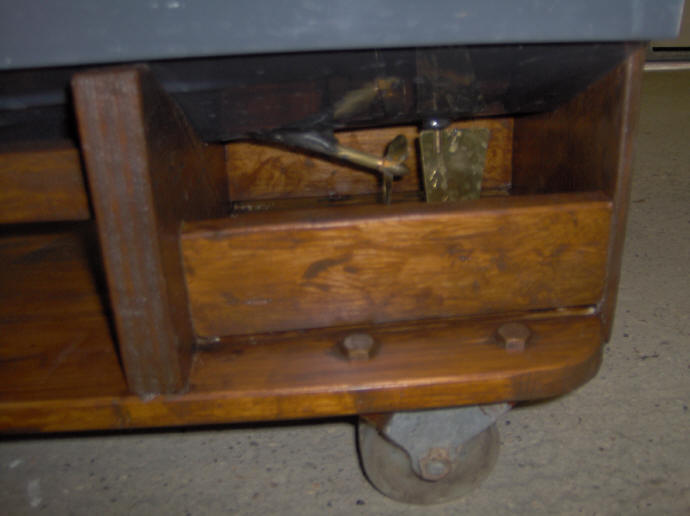
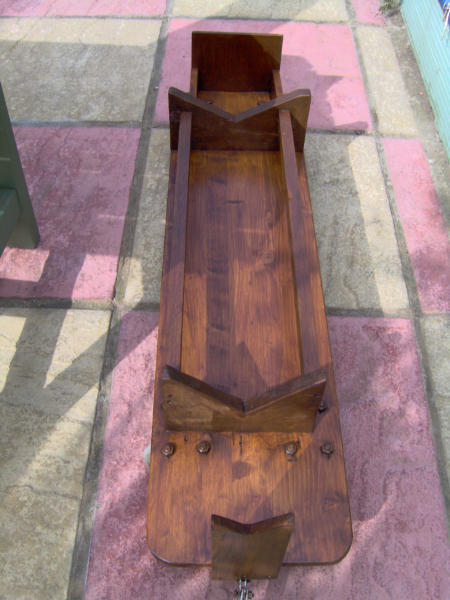
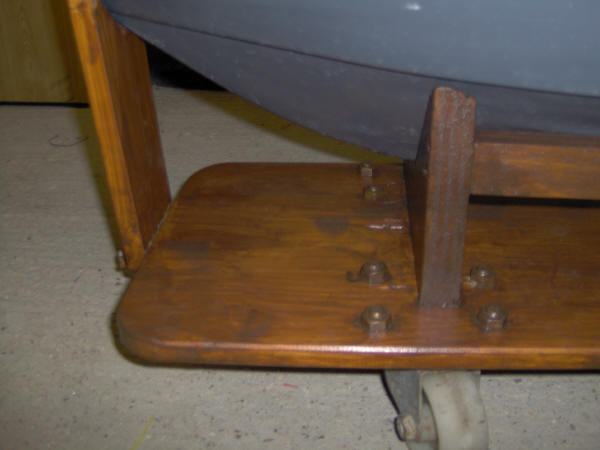
Transport trolleys The stand was made to fit the ship on. This consisted of a solid board sixty inches by 16 inches, the size of the ship’s hull. The shapes were made for the ship to sit in comfortably at front, middle and back, then strengthened lengthways by fixing each upright to the next. Fixed wheels were fitted to the rear and steerable to the front. Two 5mm holes were drilled in each side of each wheel to take 75mm bolts. These were to lock the wheels during transit. A long handle was made for the front to pull the trolley along. Four 22mm pipe clips were fitted underneath to attach this trolley to trolley two. This trolley was designed to go into the back of the car and to travel along corridors, or go through doors, if the route to the water dictated it. The second trolley was made to transport the ship and the first trolley across rough ground or long distances. It consisted of a shortened fishing trolley. The way it worked was like this. The ship sits on trolley one. Trolley one is steered to the back of the car and the front end lifted to rest in the back of the car. The rear of the trolley is lifted and the whole trolley slides on it’s wheels into the car. The wheel lock bolts are applied and away to the destination by car. At the destination trolley one is slid out of the back of the car. The back end is rested on the ground and the front end is lowered to the ground. Trolley two is unfolded and placed next to trolley one. Trolley one is then lifted up at the front and trolley two slid under it until the 22mm pipe clips line up with the frame. Trolley one is lowered and it is now sat on top of trolley two. The ship is now transported sideways so it needs wide access. At the waters edge, usually the local jetty, the whole outfit is steered over the top and lowered into the water until the ship floats on it’s own. To remove the trolleys it is simply a matter of lowering it further into the water, sliding back or forth, then lifting out of the water. Getting the ship back out is exactly the reverse. It works a treat. The whole outfit had it’s first public viewing to our club at Aylesbury on Sunday June 26th 2005. It was met with admiration from fellow members for its originality and the youngsters loved the ships bell, destroyer sound, bright lighting and radar. I do not class myself as anything like a really good modeller however, even I was proud to see that a mere mortal such as I had produced something that actually works. On the water the bow waves and wash looked true to scale. Being high out of the water I took it steady around the ‘bends’, although she has been tested to 70 degree list and still stayed upright. I had to be careful using the rudder in jerky movements as this is what causes her to ‘rock’ from side to side. Her speed was estimated at a respectable 8 mph – fast when you think it weighs 66lb (30kgs). I intend to have a lot of trips out with it and next time it will be in full darkness on the lake, being launched from the local pub bandstand. I shall be taking the dinghy just in case.
And what about the thoughts of my wife?
Well, we are getting to know each other again and folk who ring are not
being told, ‘ He’s in the garage of course!’. She did attend the maiden
voyage and maybe I can encourage her out more, if I can find a venue that
is sunny with a park bench for her to read. She has been VERY
understanding throughout. |
|||||
|
|
|||||
|
Future working functions And finally, if I ever master flying a small helicopter, a helipad attached to the rear to bring back a helicopter from the ship when anchored in the middle of the lake. The latter may well be just a dream but dreams are what realities come from.
Thanks for looking, |
|||||
|
HMS Indifference – Updated Jan 2009 It is now three and half years since the finish of the build of HMS Indifference. During that time she has sailed on many canals and lakes and never failed to amaze. Most years she has been to Black Park, Slough for their annual show. On the first occasion it gave me the chance to try out my first addition since the build was completed – an mp3 player that played 3 pieces of music in a continuous loop. The music was; 1. Rule Britannia, 2. Land of Hope and Glory and 3.The National Anthem. It was so funny seeing people stand to attention and salute as it passed playing the National Anthem. Even more satisfying is letting the youngster ‘have a go’ and him saying, with beaming eyes, ‘WOW, wait till I tell my mates I sailed an AIRCRAFT CARRIER!! That will have been after he had squirted his parents with water from the two water cannons on the ship. That’s what makes it all worthwhile. On one occasion I was invited to attend a ‘Night Sail’ at Black Park. This was spectacular as I took the opportunity to test out the newly installed Pyrotechnic launch tube. It was constructed of a one and half inch waste pipe approx. 10’’ high attached to the rear of the deck. Up each side was a 3mm steel rod terminating with 2 x crocodile clips. The bottoms of the tubes were connected to the main battery via a servo, which made the live connection by the use of Channel 5 of the radio control. Between the crocodile clips was clipped a piece of cigarette lighter element from an old car. The flare was dropped into the tube and the wick was sat under the element wire. In the middle of the lake, when no-one was expecting it, as no-one knew it was attached I threw the switch. The element glowed and lit the wick. ‘Wicked’ would be an understatement. Everyone stared in pure bewilderment, some of the ‘Peter Perfects’ were not amused of course, but who cares. Life is too short to be serious about anything. Never did get the anchors to work for real. I have just one thing left to do – take it through a Canal Lock for real. I have looked at it many a time and am almost sure it will go through with ease, I think. I just don’t fancy seeing it sink to the bottom of 15 foot of water at the moment. I will wait until the Spring and see what happens. |
|||||