|
This was my first build RC boat (!!!?! Mayhem). It was a choice
between a Victoria and the Comtesse, the looks of the Comtesse won the day.
So I was a little disappointed when opening
Robbe's box of bits to find that the details depicted on the box and their web
site, the decals on deck and hull, cleats on mast, were not included. An email
to Robbe resulted in another set of decals but still not as depicted. But to
their credit they did try. It was
useful having the spare decals as, after looking at another Robbe Yacht's
instructions on the web, the decals were described as the water transfer type.
As there are no instructions at all, one way or the other apart from apply,
I tried soaking them in water and ruined a set of windows. THEY ARE STICKY BACKS
i.e. "just peal off and apply".
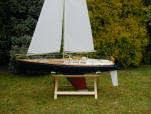
It was at this stage that I decided that if I were not to have a blue deck I
would veneer it instead. Walnut and lime planking was laid over thin ply and
finished with about seven coats of varnish. I wanted to roughly scale her to a
32 footer. To this end, I made a wooden tiller and grab rails and fitted vents
to the cabin.
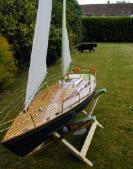
With extra metal cleats (see fore deck and mast) and turnbuckle shroud
tensioners fitted, the job of rigging and de-rigging the mast and sails was made
easier.
The build was straightforward with the exception of the internal mainsail sheet
return wheel. The main sheet kept snagging when running out, so I retro fitted a
good quality pulley block. Not a job I would like to do again. Big hands, no
space and lots of stress. I would recommend fitting a pulley horizontally to the
bulkhead before fixing it into the hull.
Another area that need attention is, the deck hook screw nuts. Carefully epoxy
them to the wooden under-deck strengtheners, making certain that the thread is
clear of glue. I used CA (superglue) as recommended and the fwd one now turns.
According to the instructions the mainsail is bent to the mast by a 2mm metal
rod threaded down the luff seam. This has changed to a pre-threaded red and
white cord in the luff seam, which must then be bent to the mast. The reason I
mention this is that I did hear that one modeller pulled the cord out of the
seam because it did not appear in the instructions. Once out never back.
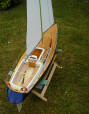
The halyards do work but are run back to
the jib sheet winches then to the cockpit to
make the aft end look a little busier.
Another thing that is ambiguous is the optional 'wing keel'. Nowhere does it
mention whether the wing keel is a replacement for, or addition to, the lead
keel ballast. I used both.
I cheated with regard to the metal stanchion lines. I used mono-filament fishing
line. It was easier to tension them by melting the aft end into a round
retaining blob (a technical term) after threading through the aft metal work.
I painted the fwd sides of the cabin to alter the profile to what, I think, is a
more pleasing one. Beauty is in the sight of the beholder after all.
She is a dry boat and sails well.
|
Conclusion.
For a first build, all in all, she went together well.
Overall: Because of the above - 4 � out-of 5
Plans: Would have liked them on two sheets as opposed to 2 sided.
Instructions: Good. A methodical build with clear parts list. Start
at the
beginning, finish at the end.
Manufacturer's after-sales: At least they replied and sent
replacements.
Dealer: Westbourne Models: Excellent and prompt. As I had no idea
what I was
letting myself in for, or what type of running gear would be needed, they
advised me well. They also advised and supplied all the extras when I said
I wanted to customise the model.
|