|
The SHADOW |
||
|
By
SHG
Marine Nick named "The Little Pig" |
||
Source:Kit:Accessories: |
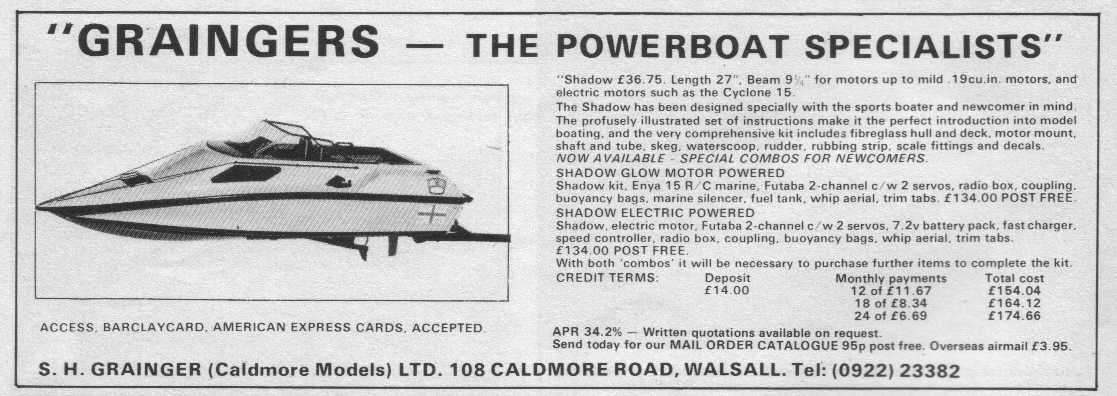
Mail order, shows, etc. Multi boat styled hull for electric or glow engine. 3.5cc Glow engine, fuel tank & silencer + radio. |
|
|
|
||
|
AIMS Now that I had actually built a radio controlled model boat (see Piranha), I wanted to get my hands on a boat with an IC (Internal Combustion) or glow engine and some real power! ( See Glow engines on this site ) |
||
|
STYLING |
||
|
THE MODEL The
fittings in the kit are all quite serviceable apart from the main
shaft which has plastic bearings, this needs to be replaced with
brass bearings. Shafts with plastic bearings are next to useless
especially on an IC boat, buy one with brass bearings which offer less friction. The rest of the bits and pieces
in the box are of good enough quality to produce a nice boat. |
||
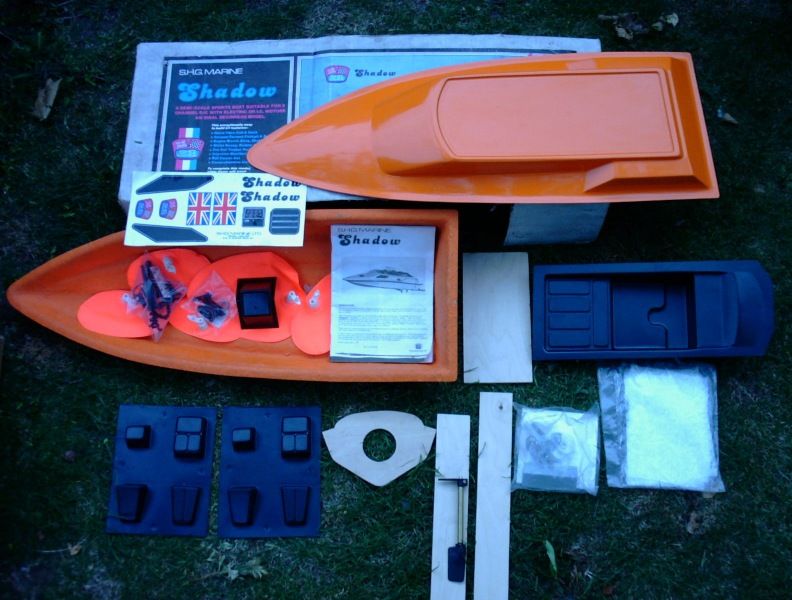
I found these pictures of the Shadow kit on
eBay.co.uk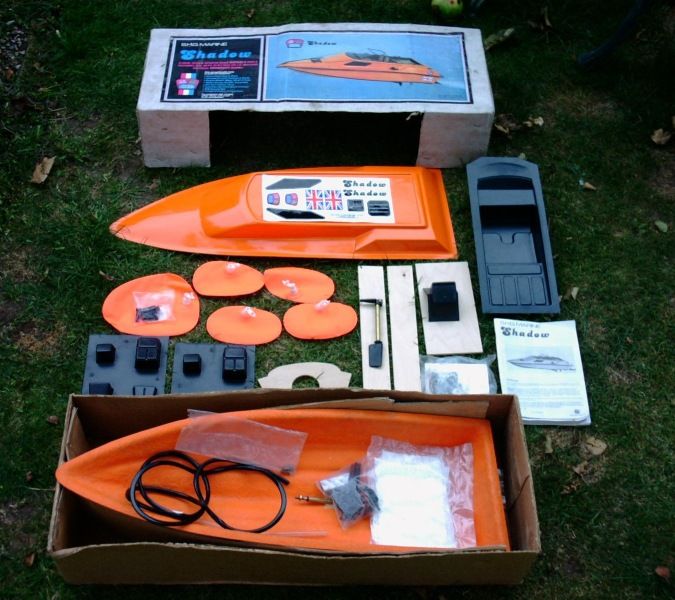


 |
||
|
THE MAKERS DO KNOW I built mine with an ENYA 19 marine glow engine and this proved just about as much as the boat could handle as you read about later. If you want to build the model with a electric motor, the maker recommend a Hummingbird 15 or a 540/550 motor but as these size motor don't come near to the power of an IC 3.5cc motor I would venture to say it could take more a powerful motor e.g. twin 540's, 550's, a single Graupner 600, 700BB or even larger, the limit being the weight of the batteries and the depth of your pocket.
The instruction booklet is
very good and gives step by step instructions with
photographs, drawings & measurements but unfortunately no full size
plan. The instructions indicates, unusually, the balance point or
centre of gravity (C-of-G). Now when you are building a speed boat
one of the most important things to get right is the C-of-G. This next
section might get a bit boring if you know about boat balancing but as
this web site is aimed at the newcomer to sports boats, I'll go over it
anyway. |
||
|
THE BALANCE POINT or C of G The balance point should ideally be half way between a third of the hull length and a third of the water line length. You can find the water line length by resting everything that will eventually go in the hull roughly where it should go and allow a little extra for paint glue etc, plonk the lot in the bath while the misses is not looking and mark where the water comes up to on the bow and transom.
Back on the work bench, mark a third of the hull length from the transom, the C-of-G is half way between the two marks. Usually you will find that a third of the hull length from the rear is good enough for most boats. The plans gives the C-of-G for the SHADOW as 230mm from the transom, if you sit down and work it out on paper you will find the C-of-G is too far forwards. This caused trouble, again as you will see later. If you now try to balance one of your boats between your finger at the C-of-G to see if it is nose or tail heavy. A badly balanced boat might run well but if the balance can be corrected by reducing weight or moving things around then a boats performance might be significantly improved. A model boat's weight distribution is different from real boats. On full size boats the engine is usually near the transom (behind the C-of-G), in model boats the engine usually sits forward on the C-of-G so we have to cheat to obtain the correct balance by moving things around.
Your model boat's engine or
batteries need to sit on the C-of-G as these are the heaviest objects
in a boat. The rest of the internal components can be moved around
the C-of-G so that the boat can be balanced out. The balance needs to
be monitored all through construction so adjustments can be made as
required. Sports boat should be as light as possible as the lighter the
boat, the higher it's potential speed but weight adds to stability
especially in choppy water. The C-of-G is important but it doesn't
need to be micro millimetre accurate especially as you won't be
winning any multi races with this boat. |
||
|
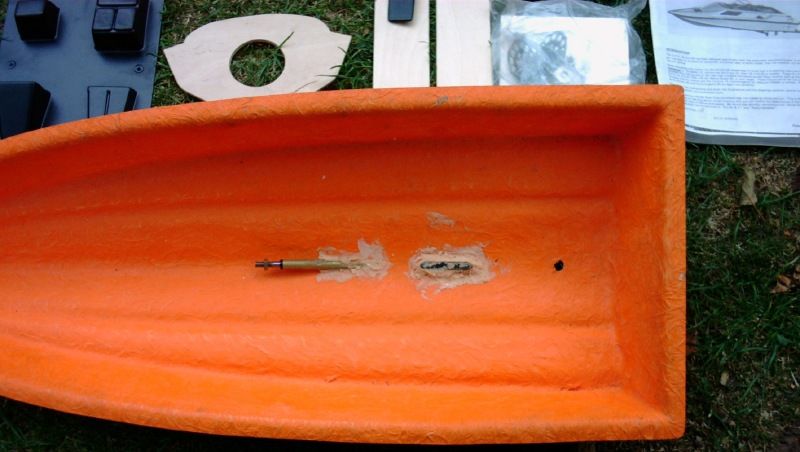
BUILDING After cutting out the holes for shaft, skeg, rudder and water-scoop the prop shaft and skeg can be trial fitted. Cutting out cardboard templates as shown in the instructions is really good and almost fool proof. The skeg is meant to be cut 10mm above the floor but if you add another 5mm, 2 or 3 small screws or bolts can be put through the top of the skeg to strengthen the joint and gives the glue something extra grip.
|
||
|
ENGINE & SILENCER
Alignment of the engine to the shaft is the section where you should spend a lot of time. I used a plastic Huco coupling as they are solid enough to handle the power from a small IC engine. On my first boat, it was a lot of bother to strip down the shaft to oil it, so on the Shadow I fitted an oiling tube near the top so the shaft can be lubricated easily. This tube is a short length of 1/8 brass tube soldered to top of the shaft after a hole was drilled through. Assemble the engine, plate, mounts, coupling and shaft and check, recheck and check again that the alignment is the best you can achieve, it will pay in the long run. Once you're happy, the mounts can be then fixed down. I used 'Isopon' to seat the bases and a couple layers of glass fibre matting and resin on top, I smoothed everything over with 'Easibuild'. Leave the engine and coupling connected together while everything set over night. The inside of the boat can then be coated with glazing resin that gives a smooth easy to clean interior. If you use an aircraft type silencer, like I did then an extension is needed to take the exhaust to the transom exhaust flange. You can make this up from brass tube available from model shops any anything lying around the shed. I included an additional in-line silencer to make the boat even quieter and exited the exhaust out through a brass transom exhaust flange. The in-line silencer was not fixed in place but held by the two short sections of silicon tube from the aero silencer and transom flange. Use clear silicon bath sealant (from DIY shops) to hold the silicon tubing to the pipes. Sealant stinks something terrible before it sets but has no smell afterwards. Make double sure the surfaces are clean before gluing.
Sport engines are best run quite cool as they will last longer, so a good flow of water is required. The kit comes with a lovely design, low profile plastic water-scoop. Run silicon tubing from the water intake to the engine head and then from the head outlet to the outlet overboard, in my case the transom. A very small dab of Superglue on the fittings not the tubes will hold them on permanently, careful not to block them! Water cooled engines don't have an inlet/outlet but if one nipple is lower than the other, use the lower one as the inlet, this will ensure that the water jacket remains full at all times. To have a fuel tank is a good idea for an glow engine. I used one of the 'SLEC' type 'clunk' tanks. As SLEC tanks are square they hold more fuel than similar sized round tank, they are also easy to secure in place and they don't have those annoying brass feed pipes that have to bent into all sort of strange shapes. A few wood stops around the base will hold it against the starboard wall. A hook and elastic band holds it in down. For
buoyancy, shows how to hold in buoyancy bags for the
starboard side only ( that's the right side looking forward if you
didn't know ), but I recommend adding some to the port side also
-guess where the port side is? . If you are planning to use foam as
buoyancy in the bow of the boat (a good idea), fix the bulkhead
very securely with resin and matting as the foam will exert great
pressure on it. I tried to save time here and filled
the bow with of foam and then sealed the
hole in the bulkhead after only a few hours. The
result showed up after a few days as the front of the
boat started to swell and ballooned up like a ball. I
didn't know what to do, so 'hesitation being
the better indecision', I left it as it was and carried on
construction! (Bubble wrap would have been a better, cleaner & cheaper
solution to start with!) |
||
|
RADIO
This box was never proved waterproof, but did it's job for the most part. Some boats get away with running the receiver aerial under the deck but I used an upright steel whip aerial (loop the top to save your eyes), a straw with the aerial wire run up it is also good, tie a knot in the top end. Have you read about not increasing or reducing the total length of the aerial wire supplied on the receiver? It make for better radio reception, thus better range from the transmitter. If you use a whip aerial, remove the length of the whip from the receiver wire. Cut and trim the cockpit parts and glue together. The windshield is a right fiddly job. Careful how you cut it out as any slip with the knife and you either have a permanent scar in the windshield or in your fingers. It helps if you grow an extra hand here to hold everything together, glue it and tape together while the glue takes. If you use the new Superglues on the market such as Zap, you only need to hold parts together for 15 - 30 seconds. Model aircraft canopy glue will prevent 'clouding'. About now
you should realise that the engine has no air intake. I cut a hole
under the seat and another in front of the seat base, no one
notices them there. Don't use the 'Velcro' strips to hold the
deck down as they get oily and yucky! Use some
sort of catch or an elastic band through small curtain loop and
hook. Fix one to the underside of the deck on a couple of
pieces of ply stuck together and glued to roughly the centre of the
deck i.e. just behind the seats. Find a convenient place
for the other hook on the hull floor where it won't foul any of the
internal 'gubbins' especially the hot exhaust pipe. |
||
|
FINISHED?! |
||
|
RUNNING IN When starting in your IC engine, ask someone that knows. (See starting glow engines on this site). Engines are not cheap and can easily be over revved and damaged if you don't know what you're doing. I read a couple of articles and a book on model engines and prepared myself and the boat for the great event. So as not to embarrass myself at the lake, I experimented with the engine and boat by starting the engine at home using straight caster fuel and running water through the engine head via two containers, one above the boat and the other below the boat. A short length of hose pipe runs the pollution out the window..... Check the washing is not out and don't do this after midnight unless you live next to a motorway! The first time the engine burst into life, the sudden noise and sense of power the engine emitted gave me a fight and it took me a couple of seconds to realise what was going on I and grappled for the transmitter to back off the throttle. "This is great" I thought and was excited that this boat looked like it might actually work. The 'boy racer' in me came straight to the fore as I stood there playing tunes on the throttle with a big silly grin on my face!
After a few more practice
starts, I got the engine running smoothly and ran it in with a few
tanks of fuel. I don't think I slept that night or the next few
waiting for the weekend. Total construction took me something
like 72 hours as I took a LOT of time aligning the engine and
prop shaft - which is not bad for only my second
boat! |
||
|
MAIDEN VOYAGE A few weeks later (on a freezing Sunday morning), I was still having great fun and the boat was still running well. Another friend, Tim, came one time to have a go, he's the guy that has done most of the cartoons for me on the site ( talented b......). It was freezing cold and Tim was questioning our sanity as we got the boat started. I was feeling quite confident now and I again started tweaking the needle valve and changed props to get a little more speed. I was running the boat without the deck so I could tweak things easily. I was using 5% nitro fuel and had just put on a bigger prop when without warning the boat hooked itself into a sharp right turn and dipped the bow down into a wave. The water rushed in and stalled the engine and the boat started to sink! My first disaster at sea.
As the boat was now half full of
water and listing heavily to port, this was allowing more water in
causing the boat to sink stern first. Only the foam I had in the bow
stopped me loosing it altogether. Now with a pointed bow now
sticking about 4 inches above the water, how on earth do you get it
back? No matter how many times I used my first boat, the
Piranha to circle the drowning boat, I couldn't get it to
catch on anything.
We had to wait 2 hours for it to drift in.
Several strong drinks (coffee!) eventually thawed us out, I thought
many things about the SHADOW for the rest of that day none of which
I can repeat here!. The boat was striped down to see
what damage had been done and on opening the radio box, water poured
out of everything. |
||
|
DUCKING AND DIVING On the lake the same thing happened again and the above sinking turned out to be the first of many, but at least rescue was easier with most of the boat above water. The more I used the boat after this, the worse it got. As soon as I got the boat anywhere near full throttle it would do something weird. It would not turn, not stop turning, suddenly twist and pull itself under the nearest wave and all sort of other tricks. I just couldn't figure what was going on much-less what the problem was. At half throttle, the boat acted perfectly but at the time I didn't see the importance of this. Somehow I had to get the boat running long enough at full speed to see what was actually happening. About this time the boat was renamed "The little Pig" and put in large friendly letters across the transom. Believing there was some mechanical or radio problem, I had an idea. I would fit a clear water tight sliding cover over the opening. A slide cover was fitted to enable me to start the engine then slide the cover forward to seal the front. So now even if it did dive into the water it would still keep going and I could work out what the fault was. Can you see the problem with this yet? Yes, an IC engine needs air to breathe. I had to cut off a strip near the transom to let air in. I only figured this out after an hour of starting the engine and it stalling when I put the lid on 20 times!
Anyway, lets try it. Well the idea worked, at full speed, it again tried to pull itself under the nearest wave but it couldn't sink this time and kept on going ... underwater, after about 3 feet it bust to the surface with the engine STILL running! It then when under two more times before it had enough and finally stalled. The idea was fairly sound even if my mind wasn't. The problem seemed to be that the boat wasn't planning properly which could be due to a hull moulding fault or wrong C-of-G. By this stage I had got so despondent with the boat that I looked back at the instructions which stated the boat can be run on an electric motor. I removed the glow motor and fitted an old car air horn's motor with a home made hose clip mount using the IC engine mount bolts. Also fitted was a mechanical speed controller and a load of old batteries. I also got fed up with the bulb nosed bow and reopened the front bulkhead hole removed the plumbers foam with a large flat drill bit used in a battery drill. Surprisingly the hull returned near enough to it's true shape after a few days!. The bow was then filled with foam chips as used in packaging and the hole resealed. I took the 'new' boat down to the water for testing but was totally humiliated to find that the motor was big and powerful but very low revving. Embarrassingly even at full speed the ducks could still swim pass while laughing at my boat. I gave up and took it out of the water pretty quickly, stuffed it in the back of the car and sped home to hide my stupidly. I've since learned never to give a launch a boat on her maiden voyage or demonstrate something new in public until it's been thoroughly tested. By this time I was ready to give up as myself, or anyone in the Peterborough Model Power Boat Club could work out the problem either. It was the middle of winter so what was I doing on the lake anyway with icebergs on it? As it happens it was near Model Engineer time at Wembley and as I was going I would ask someone there. An answer was soon coming from the Model Power Boat Association stand. "Your rudder is too big". What happens is that the water leaving the propeller blades leaves in a spiralling motion, like a corkscrew. As soon as speed increases the rudder gets caught up in the swirling water and starts to twisting the boat in the same direction via torque action. Back home I worked late into the night cutting the plastic rudder into strange and interesting shapes.
|
||
|
TUNED PIPE
Parting with a few more quid I left a model shop with a 3.5cc size power pipe on the car's front seat. Fitting it to the boat was a little difficult as the engine is obviously tilted downwards towards the shaft so the manifold section of the pipe had to eased into a slight curve. I must stress here that this is not recommended by the manufacture by Irvine so you do this at your own risk. Clamping the manifold end in a vice (from Miami ... Miami Vice! Get it?) and slowly heated the front section with my DIY type blow lamp (no flash workshop tools here) and gently eased up rear of the pipe in several easy stages until it would be parallel with hull and the end was in-line with the transom exhaust fitting. The Power pipe was supported at the end by a short length of silicon tube to the transom fitting. During this refit the plastic rudder was replaced with a better home made brass one of the same shape, the sliding deck was also removed and the original cockpit refitted. The 'little pig' was ready for the water again. I had told big Jason about my boating problems and came down to the lake for a laugh. We started her up with an X40, adjusted the needle for maximum revs, fitted the deck and let go. The increased power from the engine was immediately noticeable as well as the almost 'pinging' exhaust note which reminded me of those Vespa motor scooters. She was up on the plane before she left my hands and was off to explore the lake before Jason had any control over her. Well I thought the boat was mad before, but now it was insane! It knew what it wanted to do and went of to do it regardless of what we asked it to do. Jason regained control as soon as he slowed it down. He tried to speed it up in slow stages but at half throttle it yelled "Freebee!" and was off again to play with some friends it saw somewhere near the reeds. We were not having any more of this and called it to attention and ordered back to the jetty at a walking pace. It dragged itself down the lake kicking it's heels and waited until Jason thought he was master again and eased open the 'motion lotion' to bring it in the final leg, it said 'TA!', and shot straight at us and embedded itself into the soggy wood at the front of the jetty. It took both of us to get it out again!
Back home out came the power
pipe and in went the old exhaust system along with a resigned
attitude that I had all the speed I was safely going to get from
this boat. The IC engine was refitted and was run for a few more
months like this and then sold to raise founds for another boat....sigh! |
||
|
CONCLUSIONS
Well all of this is just my opinion,
but what do I know! |
||
|
EPILOGUE As a matter of interest, another SHG SHADOW made an appeared on my local lake. I waited around to see what it was going to do. He had fitted an OS20 (which was a slightly more powerful than the ENYA 19 I had used), an aero silencer and a single buoyancy bag in the bow. (The first thing that came to my notice was it that it made as much noise as mine did, for such a small boat they are a little noisy. If you are going to build a SHADOW then rubber engine mounts should be considered, SHG make an ideal set that would require very little modification to the kit if fitted.) Anyway, once started, the boat shot of across the water and soon started to show exactly the same problems that mine had i.e. ducking and twisting when full speed was reached. It was better than mine because of the lightness of the bow and didn't submarine as my model did but even so the driver was very tentative on the throttle. We put about pound of lead in the stern, behind the rudder tube. This improved the attitude of the ride with the bow coming up cleanly out of the water but still the torque effect could be clearly seen, pulling the boat into a starboard turn at full speed.
With a little
patients and some lead waiting and/or trim
tabs could result in a successful, if a little
over powered SHADOW. If you have built one of these boats we would
like to here from you.
Email me
at MAYHEM . |
||
|
MODIFICATION POSSIBLE
FINAL SPECIFICATION |
||
| PERSONAL RATINGS (out of 10) | ||
|
Value
.............................. |
9 (Needs no additional fittings) 6 (Fairly nice, most parts included) 4 (Hull design lets down a good kit) 8 (Very good instructions) 6 (Comes with a nice bits to stick on) 3 (See text) |
|
|
The original advert SEE ALSO....
The local club predominately run
multi type boats, multi meaning multiple boats run against each other.
I wanted to join in and win a race or two. I saw a second hand
boat in a model shop and so bought it and entered the realms of
multi boat racing.
Click
to see how I got on with "multi boats".... |
||
|
|
||
|
|
||