HYDROSPEED - Graupner

Running name               "The Hydro"
Accessories required.           Motor kit, speed control & batteries) + radio.


The HYDROSPEED is semi-scale model  of  inshore  race  boats  that have  very  powerful   'souped'  up  outboard  engines.


AIMS 
I  had heard that the German companies make excellent kits so I wanted  to  test this for my self. I also wanted to experiment with surface drive  and  get  the  'feel'   of   working with ABS.  ABS  stands  for  Acrylonitrile  Butadiene  Styrene...... that's  why it's shortened to ABS.  ABS is like  the  stuff plastic knifes and forks  are made but not quite as brittle.

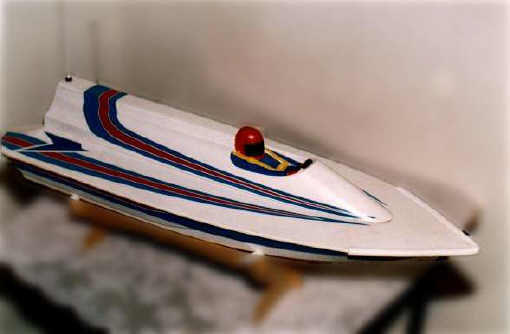
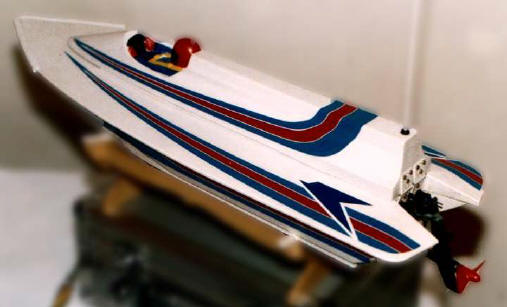
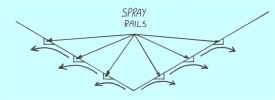
After   relatively  good success with the MFA PIRANHA,   another  electric  boat  was required to race against but one a little faster this  time.   I was  now  looking  at  all  the different sports boat kits on the   market  and  was  having  a  hard  time choosing one as there are quite a  few  on  the   market. Most seem to be made  by  foreign  manufactures  and constructed  in  ABS plastic.  ABS "sports"  kits may seem  to be  expensive for what they are,  a  few sheets of moulded plastic  etc,  but  their standards of manufacture are  very high and usually a lot of effort has gone into the design.   Eventually my choice  came  down  to  two  boats,    the  Graupner  HYDROSPEED   or  the  Kyosho  CASABLANCA.  I  nearly  bought a Kyosho CASABLANCA as it is  very  sleek  looking  catamaran with twin electric outboard motors,   but due  to  it's   price  and conflicting reports that I had heard about it,   I  bought  the  slightly cheaper model, a Graupner HYDROSPEED.  As it turns out the outboard motors on the Casablanca look much better than they ran!

  The  Hydrospeed's hull design is 'shallow Vee'   with spay rails that  run   the   length   of  the hull that raise the hull up out   of   the   water.  Briefly,   spray  rails  stop water riding up the sides  of  the  hull  by  deflecting the water downward providing lift,   thus rising the  hull  out  of  the water reducing drag. 
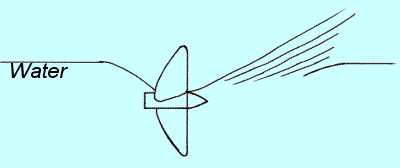

SURFACE DRIVE
  I   had  noted  that  all  full size  racing  boats  use  what  is  called    semi-submerged,   super  cavitating,   surface piercing or  surface  drive  propellers.   As the name suggest, the propeller isn't completely  under   the   water  all the time but runs very near to the  surface   and   actually  only  partly  in the water.

  "But  doesn't  that mean that you  only  get  half  the  thrust?"   That's  what  I said,   but much higher propeller  speeds  are obtainable  because  less  of the propeller is in the  water.   I  know that doesn't make  much  sense  but it had been explained several times  to  me  and I still  don't  fully  understand it.   It's something to do  with  the  speed that  blade  can  pass  through the water and if only one blade is  in  the  water,  it  doesn't  pass  through the wake made by the other blade or  blades and  so  can  take  a  clean bite at undisturbed water.   
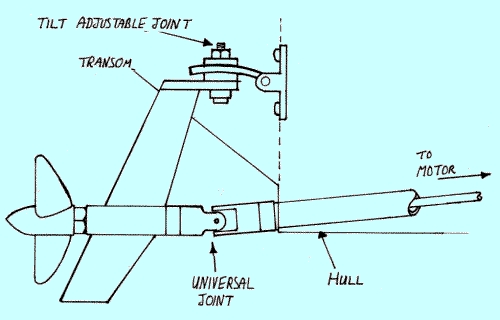
For more information on surface drives, have a look at...


http://www.simplicity-marine.com/surfprop.htm

All I know  is   that   a  surface  drive  propellers  boats  can  go faster that  a  boat   with   a  submerged drive for the same amount of engine power.   I think I can  here  the howls of criticism already.

Surface drive propellers are used on outboard engines,   stern-drives  and   outdrives.   You know what a outboard engine is,  a sterndrive or strudder  is   a  boat  with a inboard engine and a drive system through the transom.

Graupner's Strudder MkI


THE MODEL
This  kit  will  produce  a fast strong boat. Construction is  simple and  only  a   nominal  amount of work is required to complete  in  a week of evenings.  The boat is made entirely  of  ABS,  hull,  deck  and cowling and measures 610 x 208mm. It has it's own made up  motor, gear  box,  shaft and strudder  unit designed for the kit  which  you  have to buy separately of  course but is worth  buying.  

The  great thing about this motor unit is that the motor doesn't need  to be lined up with the shaft as the gears take care of that for you.  The  motor  attached is a Graupner 7022,  a 550 sized motor and  of   excellent  quality,   it  can rev over 20,000 rpm and withstand 40 Amps (stall current)  and still win a race!    As  the  propeller  is  surface  drive,   normal  propellers don't very well  at  all.   Order   a  spare one or two propellers along with the universal joint  (UJ)  which is  also non standard.

This  kit doesn't need any modification but I made a few to make  for easy   maintenance.   Most  of  these modern prefabricated kits  have  been  well  thought   out in nearly all the parts you'll need for completing  the  kit  are  made by the manufacture.   This I think is a good idea  because  the   amount   of  time  I've wasted looking for or making parts  for  boats  is  nobodies business.  True, the makers prices have to be seen to be believed  but  if you are not into making everything from scratch then you can be on  the   water  in double quick time courtesy of the manufactures   producing  quick build boats.

The   kits  instructions are very clear and are good for  the  first  time   modeller,  a  large full size plan is also included.  The instructions are  translated from German to English and will  provide   a  free giggle while  building.   The  instructions  do  tell  you  everything you need to  know  but  I'll provide you with a few extra  points  to watch out  for.
 

STABILIT EXPRESS
There   are  only  three  main glues that  will  hold  ABS  together 
1) Stabilit Express, 
2) Superglue &
3) HART. 
Don't bother   using   anything else unless you want the whole thing to become a kit again  the   first  it hits anything.  'Hart'  glue does hold ABS but easily  melts and  distort ABS. Superglue is good but you have to get the parts in  the right  place first time unless you use a thick or slow-set super-glue. Stabilit is  best  as it  comes  in the form of an epoxy and gives you about 20 minutes working time  before  it   sets.   The  setting  time  can be extended if you  use  less  powder  but   don't  use  to  little as it won't have it's  full  strength  when  set.   If  you  can,   grow  a  few extra hands  to  help  you  mix,  manoeuvre  and  hold  everything  in  place   during  the  gluing  process  especially the deck joint.   Just before Stabilit  sets, excess  glue can be  cleaned  off with methylated spirits.  Rough the surfaces to be glued  with  sandpaper first to ensure a good bond.

Due to the high price of Stabilit glue , I tend to use thick super-glue for nearly everything apart from high stress areas such as prop tube exit and around the transom.
 

BUILDING SITE
To start,  all the ABS parts have to be cut out.   The  cutting  lines are  slight  groves in the ABS,  highlight these lines with a felt tip  pen  or  pencil.   Trim  out  the hull with a very sharp knife or  scissors.   If you use a knife,   make a light  cut to  start  with then gradually deepen it on progressive cuts, flex the  cut  and the ABS will cleanly split along the line.   Spend time  on  this  stage   as  any mishaps are very hard to repair.   There is no easy way of  doing   this   and  it  important that you get this right as most  of  the  strength  of  the boat  is  taken from the hull / deck joint.  This  joint  also  forms  an  airtight  seal  for  flotation in case of  a  sinking.  I  didn't  trust my workmanship  and glued in some expanded polystyrene (or bubble wrap) in  the hull spaces with PVA glue  just  in case! 

With  all parts cut out, glue the radio tray to the underside of the   deck   and   leave  to set.   The plans are very clear on how to make the hull to  deck  joint but just you  wait till you have to do it for yourself!!   When  you  come to fit the  deck,   everything  will  try to move it self out of  place  and  generally  be  as  difficult  as possible.   Plan how you  are  going to hold the  joint in place  while  setting and have several practise runs.

The plan show the joint glued from the outside only but it would be better  to  get some Stabilit under the joint as well.  You could try  Sellotaping  the  deck down  or 'tacking'   the deck down with tiny spots of  Superglue  and then  seal  the  joint  with  Stabilit.  
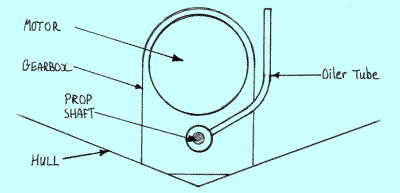
 

RUNNING GEAR and ELECTRICS
Fitting   the  motor is clearly set out on the plan and this needs  to  be   followed closely as the gearbox casing needs trimming  to fit the hull floor.  Cut it  down  till the large gear only just clears the bottom.   This will  reduce  the   shaft  angle  to  the strudder will mean a  smaller  angle  for  the  outboard UJ to cope with.  The greater angle the UJ has to work with,  the  more  power it will drain from the motor.   Why?  Because every  time  you  'bend'   the  UJ you are moving the drive line out of alignment  and  thus  loosing power to the friction in the UJ.   This can be tested by moving  a  core  of a Bowden cable or snake in and out while straight and then  while  bent in a circle,  it's notable more stiff when bent. "What about when you  turn the boat using the strudder,  don't you loose power?" Correct,  limit  the   turning  angle  of the strudder to about 10  degrees  each  side  of  neutral.   The  less change in direction that the drive line has  to  deal   with,   the less power will be lost and thus more power delivered  to  the  propeller.   The  boat  won't turn tight circles like this  but  the  boat  wasn't  designed  to enter steering competitions.

Talking  about  the main shaft,   drill a hole in the tube and fit  a  the   plastic  shaft oilier but it's difficult to use in practice when the  boat  is  complete.   I fitted a brass oiling tube 1/8 OD about 10mm  from   the  front bearing,  just behind the gearbox housing and curved it  around  the  motor  and cut it of level with the top of the motor.  Stuff   tissue  paper  in the ends of the shaft to  prevent  blockage and soft solder  on the oil tube building  it up to form a strong fillet. 

When fitting the shaft, ensure   that there is lots of Stabilit around and under the shaft at  the  transom  because  it  will soon be covered by the  radio  box  floor.   Be  careful  when fitting the strudder unit as the position marks on the  hull  aren't  quite  right  so make correct marks taken  from  the  plans.   The  control   rods from the servo to the strudder took some real  bending   to  get   right.   The  shape on plans didn't want to work  at  all,   so   be  prepared  to  spend a whole evening on just these linkages  alone.   On  a  later boat,   a Graupner Key West, these links are made from short lengths  of Bowden cable and are a much better idea. Use your wife's (or husband's?!) nail polish to lock in the grub screws.
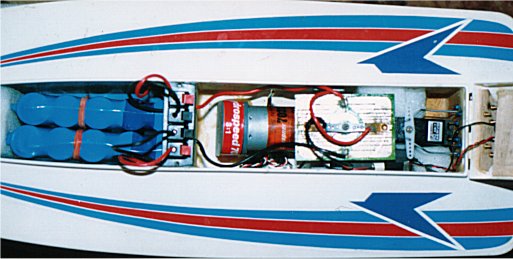
 

SPEED CONTROL
Fit an Electronic Speed Controller and save your self a lot of hassle! I fitted a mechanical one.... see Electric motors and a little bit more.

The plans do not include a water  tight  radio  box  which caused me some concern during building but  in  practice  it's  quite  difficult to soak the radio gear anyway (see  conclusion).  I  don't  like  the sound  of all-or-nothing speed control as you get with micro  switches,  so I  modified  the  internal layout to suit an 8  Amp  'Bob's'  board  speed  controller.  Clean  both  the top of the servo and bottom  of  the   control  board   with   meths or thinners and stick the  board  down  with   double  sided  tape  or  hot  glue.   The output arm of  the  servo  needs  to  be  modified  to  fit  the  wiper  contacts  but  this  is   covered   in  the  instructions with the 'Bob's'  board.   Lubricate the wiper contacts  with  silicon  grease.  Because  of  using a Bob's board and the addition  of  a  bulkhead  the  radio layout was slightly altered to fit.  The servos  were  screwed  to  wooden rails that were in turn fixed to the radio  box  walls.

A  bulkhead  of  3mm ply was fitted behind the motor   to   prevent  water  splashing   all  around the boat.  I left room in front of the gearbox  to  allow  the cover to be removed for servicing but trying to get it back  on  again  in  situ is next to impossible.  I was still  using   the   battery  sets  I made up for the PIRANHA and so I  fitted  the  same  speaker  type  speaker  wire connector for the battery leads.   A  piece  of  foam  holds  the two battery packs in place.


THE TOP
I   fitted  hinges to the back of the cover to allow quick assess  to  the   internals   and   to  stop  me  losing  the  lid.  I  used   aircraft   type  rudder/elevator  hinges  made from nylon with a removable hinge  pin.   Be   careful  to get the two hinges parallel as you don't want them to bind.  I  fixed  the  hinges with Stabilit and 8BA brass screws and nuts - massive over kill.   It  will  help   if  you reinforce the rear of the cover with ply shaped  and  again  fixed  in with Stabilit.   A small   magnetic door catch was used to hold the front of the lid down.  With  the  additional  bulkhead in place the front compartment was too small for  the  radio  batteries so a small shelf was glued to the rear of the  cover   to   form  a small battery compartment.   It was not quite to the rear  of  the  cover   to allow the battery lead and plug to come through to the  cockpit  and   for the aerial lead to come out to the straw aerial tube  fitted  to  the rear top of the cover.
 

FINISH
As   with any model boat always waterproof the woodwork even if you  think   it  can't get wet,  there is no part of a model boat that never gets  wet!  To  protect the front of the boat I used a  length of white rubbing  strip  fixed  in  place with Stabilit or Superglue.   You have  to cut out a  'v'  shape  to fit the sharp angle at front.  The last thing to do is apply the  decals.  Mix a drop of washing up liquid  into  a  saucer of water and use  a tissue to wipe this onto  the  surface  where  the  decal is to go.   If  you  don't  get it right first go  you  can  slide  into position with  no  harm done. No,  the soap will not cause  the  decals to lift later as long  as you don't use too much soap. It took me a total of about 24 hours work  to get the HYDROSPEED ready for the water.
 

SAILING
Centralise the strudder and steering  servos to the  transmitter and check range.  Oil and  bed  in the running  gear and you are ready for the lake.  Because of  the  distance  the  strudder   protrudes   from the  transom  be  careful  when  transporting the boat  around  as  this could get bashed.   I dropped mine  backwards off the  cradle  and  straight  onto prop.   I managed to repair  the broken top of the  strudder  bracket  with thick off cuts of ABS  and  Stabilit.   It  held  without any further breaks.   A new UJ was  also needed  but  these are  not  easy to come by.   The UJ's are Graupner  own  type  so can't be replaced  by  any other make as none are the right size.

I   set up the tilt of the strudder to run parallel to the hull  keel  and   float   tested the completed boat in the specially built heated  fibreglass   test tank in the bathroom, she floated level and true.  I was chased from  the   test area when I revved up the motor as this sent a spray  of  water  up the bathroom walls!

Down  at  the  lake with 'all engines ahead one third at  the  helm'   the   HYDROSPEED   whirred  like a food mixer and gurgled and burped  until  the   propeller  got  to  grips with the water.  She has  a  good  rate  of  acceleration   and a rooster tail of spray is thrown into the air  by  the  surface  piercing prop.   All was well she had no horrible quirks and  did  what  she  was  told.   'All ahead flank',   at full  speed  the  whirring  increased   relative to the speed.   She is not quick but quite fast,   it  takes  a   few   seconds  for  the propeller to  grip  the  water  from  a standstill  so  a steady  acceleration is needed from the throttle  for  a  quick  takeoff.   The roster  tail  of spray from the propeller does  look  really good when  it  catches  the sunlight as you cross the lake.


CONCLUSIONS
All  in  all a very good model,  kit and a lovely performer on the  water.  Because  of the Hydrospeed's shallow draft you have to be a little careful  not  to run into other objects on the water.  I hit something once and  my  boat  performed  a  nice half barrel role and landed   upside   down,  but  interestingly as the hull floats very high in the water the radio remains out  of  the water.  As the radio box is open you do have to watch for is water  splashing into the interior but not much ever does. 

Again  I had many months of running with this boat before selling it to  a   friend,   Hi!   Dave.  He thought it could go faster after his first trial  run.   Out came the two 6v  packs  and  in went two 7.2v car racing packs.   Still   wanting  more speed from the  boat,   out  came  the  three-to-one  gearing  and  in went a two-to-one gear set.   Now the boat can  keep   up  with  some  of the IC boats all be it for a short while.   It  has   since  suffered a motor burn out due to a weed plant sabotage.


LESSONS LEARNED
ABS  is  funny stuff,  very strong and easy to work with but mistakes  are  hard to repair and hide.  Be careful if you  use  Hart  glue as this can  melt  and distort ABS.   There is  a  another  version  of  HART  glue  used by  plumbers to glue  plastic  pipe  solvent  called OSMAROID,  careful though, it  strong and easily melts ABS.  Always  clean  and  key   ABS  before gluing.  If you are going to  fit  something  permanently  to the boat,   such  as the radio screw it down,  don't  hope  double  sided  tape will  hold  it forever.  Don't drop the boat  on  it's  propeller!
 

MODIFICATION POSSIBLE
High performance motor.
High power batteries.
Water cooling.
High performance running gear.
Direct drive running gear.
Different ratio gears.
Metal props.
Electronic speed controller.
 

FINAL SPECIFICATION
Motor and gearbox Graupner Hydrodrive 7022 (3 to 1 reduction)
45mm Graupner surface propeller
8 Amp Bob's speed controller
10 cells (12v)
Accoms 2 channel radio
External radio switch


PERSONAL RATINGS
Value ....................
Kit Quality ..............
Kit Design ...............
Ease of Building .........
Finished appearance ......
Handling .................
 

 (out of 10)
6 (All ABS kits are on the dear side)
9 (The ABS is moulded to high standard)
9 (Does just what makers say it will do)
8 (ABS takes a little getting used to)
8 (Comes with nice decals, no painting)
8 (Fast, very stable)
 

Coming up....
Back  to REAL sports boats.   I had bought an old copy of Model Boats from  83',  an  add read "Are you fed up with running  Multi-Hulls that look  as  attractive  as  a plank of wood,   just so that you  can compete  in  your  clubs competitions?"   Within a few days I had located a Hydrafibe kit at  Keens   Model  shop of High Wycombe.   'I came,   I saw,   I did a  little  shopping'  and picked up  a  Hydrafibe PREDATOR. 

  Well  all  of this is just my opinion,  but what do I know! 


From left to right & Top to Bottom.
SHG Laser   -   SHG Shadow
Hydrafibe PREDATOR   -   Graupner Arrow
Krick Avanti   -   MFA Piranha   -   Graupner Hydrospeed